After Test Summary
I passed this on 5/25/2018. This was not as hard as I thought it was going to be but it was still tricky. Hope the guide helps.
Stuff to know:
- Identity Provider & Service Provider definitions, roles, and their roles in flows
- SAML SSO – Configuration, Certificates, How Trust is Established, XML is used and not JSON
- OAuth!! – Flows, scopes tokens! Know which flows allow refresh tokens. On my exam, they only asked about web flow, user-agent, and JWT but make sure you know the others too!
- There were also questions about certificates
- 2-3 questions on community registration.
- Identity connect had some questions too.
Overview
This is the study guide I’ve prepared for myself to pass the Salesforce Identity & Access Management certification. This is the last one in my Throwing Down the Certification Gauntlet challenge but also the one that worries me the most because I’m not intimately familiar with all the OAuth flows and have yet to implement SAML authentication. However, I’ve implemented authentication in various ways such as Forms Authentication, Active Directory authentication using LDAP, and more recently using OpenID Connect & different OAuth Flows. I’m pretty familiar with Identity Concepts overall but the particular protocols and their details are what I need to learn.
To prepare, I’ve read all the resources in the Resource Guide, did the hands-on activities, and watched various videos. Now that I’ve gone through it all, I’m feeling much less stressed and much more informed. Going through everything took about 25 hours or so but that included writing much of it down. Going through the resources and doing the activities took probably around 12 hours or so.
DISCLAIMER: This is very, very long because it helps me to write stuff down. Almost all the content are from resources listed in the Resource Guide. I’ve also put various “Source” links in each section.
Resources
- Exam Guide
- Resource Guide
- Always A Blezard
- Decoding the Cloud
- Salesforce Memo
- SFDC Architect Journey
- SFDC Point
- Santanu Boral
- OAuth 2.0 Explained By Aaron Parecki
- OAuth – The best resource I’ve seen describing OAuth from a client and server perspective!
- Single Sign-On Implementation Guide
Exam Outline
- Identity Management Concepts – 34%
- Describe the role(s) an identity provider and service provider play in an access control solution
- Describe common methods how trust connections are established between two systems and the methodologies used to describe trust between an identity provider and service provider.
- Given a scenario, articulate whether it is describing an authentication, authorization, or accounting scenario and what Salesforce feature should be used to accomplish the task.
- Given a scenario, recommend the appropriate method for provisioning users in Salesforce and other third party services (SOAP/REST API, SAML JIT, Identity Connect, User Provisioning for Connected Apps, etc)
- Describe the risks to enterprise security that federated single sign-on solutions aim to address.
- Given a scenario, troubleshoot common points of failure that may be encountered in a single sign-on solution (SAML, OAuth, etc.)
- Accepting 3rd Party Identity in Salesforce – 21%
- Describe the components of an identity management solution where Salesforce is accepting identity from a 3rd party.
- Given a scenario, recommend the appropriate authentication mechanism when Salesforce needs to accept 3rd Party Identity (Enterprise Directory, Social, Community, etc)
- Given a scenario, recommend the appropriate method of SAML initiation to fulfill the requirements (SP-init, IdP init, etc)
- Describe the components of a Delegated Authentication solution.
- Describe the risks of implementing delegated authentication
- Salesforce as an Identity Provider – 18%
- Given a scenario, determine the most appropriate flow type to recommend when implementing an OAuth solution where Salesforce is providing identity to a 3rd party (E.g. User Agent, Web Server, JWT, etc)
- Describe the various implementation concepts of OAuth (Eg. scopes, secrets, tokens, refresh tokens, token expiration, token revocation, etc.)
- Describe the role(s) Connected Apps play when Salesforce needs to provide identity to a third party system.
- Given a scenario, recommend the Salesforce technologies that should be used to provide identity to the 3rd party system (Canvas, Connected Apps, App Launcher, etc)
- Access Management Best Practices – 12%
- Describe the risks that Two-Factor Authentication mechanisms aim to mitigate.
- Given a scenario, determine the most appropriate Two-Factor Authentication mechanism for an identity solution.
- Given a scenario, identify the risks and mitigation strategies that session security and Two-Factor Authentication enable (E.g. High Assurance Sessions, 2FA, etc)
- Salesforce Identity – 8%
- Given a scenario, recommend the most appropriate Salesforce license type(s) to support the identity requirements.
- Describe the role(s) Identity Connect plays in an Identity Management solution.
- Community (Partner & Customer) – 7%
- Describe the capabilities for customizing the registration experience for external communities (E.g. Branding options, self-registration, communications, etc)
Single Sign-On (SSO)
A way for users to only provide one login and have all their systems use the same Identity Provider (IdP).
Salesforce Offered SSO Options
- Federated Authentication – Uses Security Assertion Markup Language (SAML) to let you send authentication and authorization data between affiliated but unrelated web services. You can log in to Salesforce from a client app. Salesforce enables federated authentication for your org automatically.
- Delegated Authentication – Integrates Salesforce with an authentication method that you choose. You can integrate authentication with your LDAP server or use a token instead of a password for authentication. You manage delegated authentication at the permission level, not at the org level, giving you more flexibility. With permissions, you can require some to use delegated authentication while others use their Salesforce-managed password.
- Benefits
- Uses a stronger form of user authentication, such as integration with a secure identify provider
- Makes your login page private and accessible only behind a corporate firewall
- Differentiates your org from all other companies that use Salesforce to reduce phishing attacks
- NOTE: Must contact Salesforce to enable Delegated Authentication before you can configure your org to use it.
- Benefits
- Authentication Providers – Let your users log in to your Salesforce org using their login credentials from an external service provider. Salesforce supports the OpenID Connect protocol, which lets users log in from any OpenID Connect provider, such as Google, PayPal, and LinkedIn
Benefits of SSO
- Reduced Administrative Costs
- Leverage Existing Investment – Many companies use a central LDDAP database to manage user identities. You can delegate Salesforce authentication to this system. Then when users are removed from the LDAP system, they can no longer access Salesforce.
- Time Savings
- Increased User Adoption
- Increased Security
What is Salesforce Identity?
Salesforce Identity connects your Salesforce org users with external apps and services while providing administrative tools for monitoring, maintaining, and reporting user apps and user authorization. It’s an identity and access management service with the following features:
- Cloud-based user directories, so user accounts and information are stored and maintained in one place, while available to other services or apps.
- Authentication services to verify users and keep granular control over user access. You can require two-factor authentication, select which apps users can use, and set how often individual users log in to maintain their session.
- Access management and authorization for third party apps, including UI Integration, so a user’s apps and services are readily available.
- An API for viewing and managing Identity features
- Identity event logs for creating reports and dashboards on single sign-on and connected app usage.
- Salesforce Identity Connect for integrating Microsoft Active Directory (AD) with Salesforce. Identity Connect allows you to manage AD users and Salesforce users simultaneoously. You can configure Identity Connect to give AD users access to their Salesforce orgs without logging in again.
To implement Salesforce Identity, use any of the following:
- SAML – Salesforce supports SAML for SSO into Salesforce from a corporate portal or identity provider
- OAuth 2.0 – An open protocol used for SSO to allow secure authorization between apps. OAuth authorization flows describe the options for implementing OAuth in Salesforce orgs.
- OpenID Connect – An authentication protocol based on OAuth 2.0 that sends identity information between services. With OpenID Connect, users can log in to another service, like Gmail, and then access their Salesforce org without logging in again.
- My Domain – Allows you to define your own domain name within the Salesforce domain (for example, https://companyname.my.salesforce.com). My Domain makes it easier to manage login and authentication and allows you to customize your login page. It’s required to use Lightning.
- Connected Apps – Integrates an application with Salesforce using APIs. Connected apps use standard SAML and OAUth protocols to authenticate, provide SSO, and provide tokens for use with Salesforce APIs. In addition to standard OAuth capabilities, connected apps allow Salesforce admins to set various security policies and have explicit control over who can use the corresponding apps.
- App Launcher – gives your users easy access to apps that they user most often. Users go to the App Launcher to launch Salesforce, on-premises, and connected (third-party) apps without logging in again. The App Launcher displays tiles that link to the available apps. Salesforce admins can make the App Launcher the default landing page when users open Salesforce.
- Identity License – grants users acces to Identity features. App Launcher is available to all Lightning Experience users. Classic users must have the Use Identity Features permission to get the App Launcher. Identity licenses are included with all paid users licenses in Enterprise, Performance, and Unlimited editions.
- External Identity License – An external identity license grants Identity features such as App Launcher and SSO to external users. With External Identity, you can give your customer and partners access to your org through an external identity community. The license is included with all paid users licenses in Enterprise, Performance, and Unlimited Editions.
- Identity Provider and Service Provider integration
- Identity Provider is a trusted provider that lets you use SSO to access other websites
- Service Provider is a website that hosts apps. You can enable Salesforce as an IdP
- Salesforce Identity Connect – integrates Microsoft Active Directory with Salesforce. User information entered in AD is shared with Salesforce seamlessly and instantly. Companies that use AD for user management can use Identity Connect to manage Salesforce accounts.
- Two-Factor Authentication – With two-factor authentication enabled, users are required to login with two pieces of information, such as a username and a one-time password (OTP). Salesforce supports user-defined OTPs and OTPs generated from software or hardware devices.
My Domain
Create your own Salesforce sub-domain to better manage login and authentication for your Salesforce org in several key ways:
- Highlight your business identity with your unique domain URL
- Brand your login
- Block or redirect page requests that don’t use the new domain name
- Work in multiple Salesforce orgs at the same time
- Set custom login policy to determine how users are authenticated
- Let users log in using a social account, like Google or Facebook, from the login page
- Allow users to login once to access external services.
When is My Domain Required?
- SSO with external Identity Providers
- Social sign-on with authentication provders, such as Google and Facebook
- Lightning components in Lightning component tabs, Lightning pages, the Lightning App Builder, or standalone apps.
My Domain Considerations
- Subdomain can include up to 40 letters, numbers, and hyphens. You can’t start the name with root, status, or a hyphen.
- When you create a subdomain with My Domain, Salesforce is enabled as the identity provider. After you deploy the subdomain, you can add or change identity providers.
- You can also increase security for your org by customizing your domain’s login policy.
- Only Salesforce support can change your subdomain name after it’s deployed
Get System Performance and Maintenance Info with My Domain
You can get information about system performance and availability from trust.salesforce.com. Trust reports status information based on your org instance. Here’s how to get status information using your domain name:
- Go to trust.salesforce.com
- Under System Status, click Learn More
- Under status.salesforce.com, click Status
- At the top right of the page, click My Domain
- Enter your domain name in the search bar to get your org instance. Don’t enter the complete URL. For example, use yourDomain, not https://yourDomain.my.salesforce.com
- Under Status & Maintenance, select All, and look for your instance.
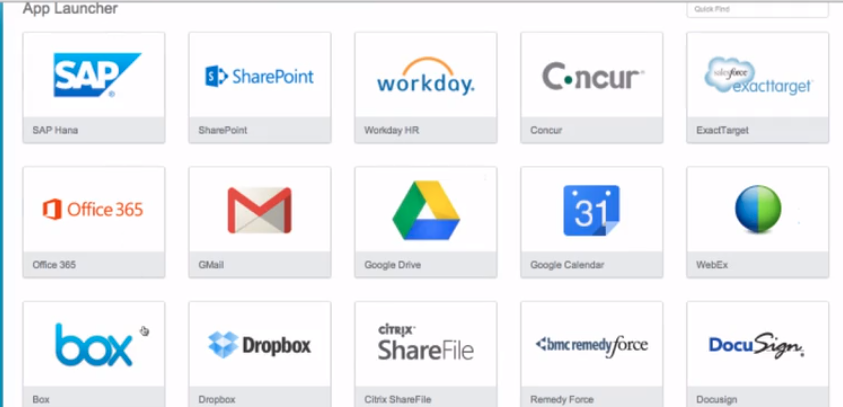
App Launcher
The App Launcher is how users switch between apps. It displays tiles that link to a user’s available Salesforce, connected (third-party), and on-premise apps. App Launcher is available to all Lightning Experience and Classic Users. Classic users need the Use Identity Features permission and the App Launcher option in their profile set to Visible. Users only see the apps that they are authorized to see according to their profile and permission sets.
Set Two-Factor Authentication Login Requirements
As a Salesforce admin, you can require your users to use a second factor of authentication when they log in.
- Manage Profiles and Permission Sets permission needed
You can require two-factor authentication each time a user logs in with a username and password to Salesforce, including orgs with custom domains using My Domain. To set the requirement, select the “Two-Factor Authentication for User Interface Logins” permission in the user profile or permission set.
Use the profile policy when you want to require two-factor authentication for users of the following authentication methods:
- SAML for SSO
- Social Sign-On in to Salesforce orgs or Communities
- Username and Password authentication into Communities
All Salesforce user interface authentication methods are supported. In the user profile, set the “Session security level required at login field” to High Assurance. Then set session security levels in your org’s session settings to apply the policy for particular login methods. Also in your org’s session settings, check the session security levels to make sure that Two-Factor Authentication is in the High Assurance column.
- Note: If Two-Factor Authentication is in the Standard column, users get an error when they log in with a method that grants standard-level security.
Integrating Active Directory with Salesforce Using Identity Connect
Demystifying OAuth and Connected Apps
Configure Inbound SSO with a Third-Party Identity Provider
This is meant for internal users such as employees using SSO with a third-party Identity Provider (IdP).
Overview of Steps
- Create a Federation ID for each user
- Set up SSO Settings in Salesforce
- Set up Salesforce Settings in the Single Sign-On (SSO) provider.
- Make sure it works.
1. Create a Federation ID
When setting up SSO, a unique identifier is used to identify each user. This attribute is the link that associates the Salesforce user with the external identity provider. A Federation ID must be unique for each user in an org.
Matching Options
- Username
- User ID
- Federation ID.
2. Set up Your SSO Provider in Salesforce
Your service provider needs to know about your identity provider and vice versa. On the Salesforce side, we configure SAML settings. SAML is the protocol that Salesforce Identity uses to implement SSO.
2.1 Enable SAML
- Open Single Sign-On Settings in Setup
- Click Edit
- Select SAML Enabled.
- Save
2.2 Set up your SAML Settings
Identity for Customers
Let’s customers or partners to login to a Salesforce Community using a Salesforce created user or through an external identity provider.
High-Level Setup Steps
- Set up My Domain
- Create a Customer Community Profile
- Create a Community
- Create Self-Registration Page
- Can provide complete control over login experience using Visualforce pages.
Default Self-Registration Actions In the Backend
What happens when a customer joins your community?
- Salesforce creates a user record and a Contact with the information provided.
- Salesforce associates the Contact with an Account that was designated.
- User Record is assigned the designated profile that you cloned from the External Identity User profile.
Social Sign-On
Allows one to login to a community using a social network. It’s configured by setting up an authentication (auth) provider for the social account. Multiple Auth Providers can be used.
Supported Auth Providers
- Microsoft Access Control Service
- Salesforce
- Janrain
- Amazon
- Microsoft Azure AD
- Any Service provider who implements the OpenID Connect protocol
- Any service provider who supports OAuth but not OpenID
Connected Apps
A Connected App is an application that can connect to Salesforce over Identity and Data APIs. They use the standard OAuth 2.0 protocol to authenticate, provide SSO, and acquire access tokens for use with Salesforce APIs. They also add additional levels of control, allowing admins explicit control over who can use the application, and various security policies to be enforced by the application.
SAML
Salesforce Identity uses the XML-based Security Assertion Markup Language (SAML) protocol for single sign-on into Salesforce from a corporate portal or identity provider. With SAML, you can transfer information between services, such as from Salesforce to Microsoft 365.
The identity provider performs most of the work to set up SSO.
- Establish a SAML identity provider (IdP) and gather information about how they connect to Salesforce. The identity provider sends SSO requests to Salesforce.
- Provide information to your identity provider, such as the URLs for the start and logout pages.
- Configure Salesforce using the instructions in Configure SAML Settings for SSO. Only this step takes place in Salesforce.
Your identity provider sends SAML assertions to Salesforce using the SAML Web Single Sign-on Browser POST profile. Salesforce sends SAML responses to the IdP login URL specified under Setup by entering Single Sign-On in the Quick Find box, then selecting Single Sign-On Settings. Salesforce receives the assertion, verifies it against your Salesforce configuration, and if the assertion is true, allows SSO.
If you have problems with the SAML assertion after you configure Salesforce for SAML, use the SAML Assertion Validator to validate the SAML assertion. You can obtain a SAML assertion from your identity provider.
If your users can’t login using SAML, review the SAML login history to determine why. Sharing the login history with your identity provider helps resolve problems quickly.
Configuring SAML settings for SSO from your IdP to Salesforce Overview
- Gather Information from your identity provider
- Provide information to your identity provider
- Set up SSO
- Set up an identity provider to encrypt SAML assertions (OPTIONAL)
- Enable Just-In-Time (JIT) user provisioning (OPTIONAL)
- Edit the SAML JIT handler if you selected Custom SAML JIT with Apex Handler for JIT provisioning
- Test the SSO connection
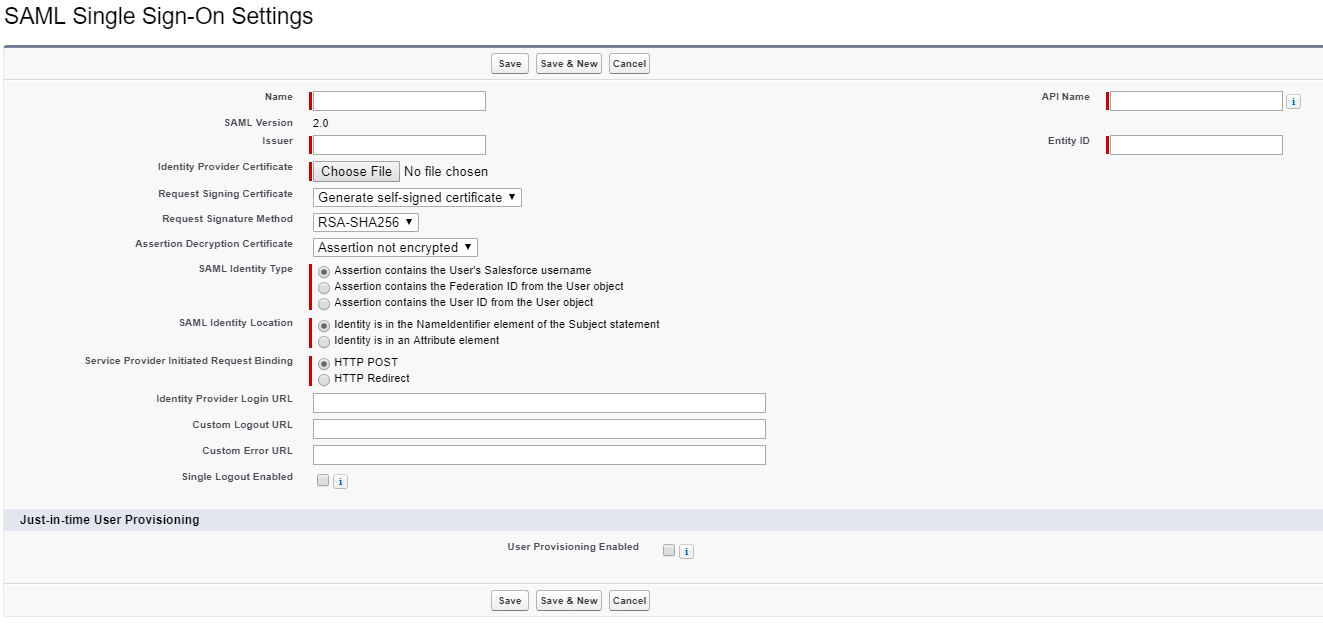
Set up SSO
- Open the Single Sign-On Settings in Setup.
- Edit, check “SAML Enabled” and Save
- Create the SAML Single Sign-On Settings by using one of the appropriate methods:
- New – Specify Settings Manually
- New from Metadata File – Import SAML 2.0 settings from an XML file from your IdP.
- NOTE: If your XML file contains information for more than one configuration, the first configuration that occurs in the XML file is used.
- New from Metadata URL – IMPORT SAML 2.0 settings from a public URL. The URL must be added to Remote Site Settings to access it from your Salesforce org.
- Settings
- Enter a Name.
- Issuer – Often referred to as the entity ID for the Identity Provider
- If your Salesforce org has domains deployed, specify whether you want to use the base domain, https://saml.salesforce.com, or the custom domain for the Entity ID. You must share this information with your identity provider.
- Tip: Generally, use the custom domain as the entity ID. If you already have SSO configured before deploying a domain, the base domain is the entity ID. If you are providing Salesforce-to-Salesforce services, you must specify the custom domain.
- Identity Provider Certificate – Use the authentication certificate issued by the Identity Provider.
- Request Signing Certificate – Select the certificate you want from the ones saved in your Certificate and Key Management settings.
- Request Signature Method – Select the hashing algorithm for encrypted requests, either RSA-SHA1 or RSA-SHA256
- Assertion Decryption Certificate (OPTIONAL) – Needed only if the identity provider encrypts SAML assertions
- SAML Identity Type – This is provided by the Identity Provider. Options:
- Assertion contains User’s Salesforce username
- Assertion contains Federation ID from User Object
- Assertion contains the User’s ID from the User Object
- SAML Identity Location – Tells Salesforce where to find the identity value within the assertion. This is provided by the IdP. Options:
- Identity is in the NameIdentifier element of the Subject Statement
- Identity is in an Attribute element. Selecting this option requires specifying the Attribute Name and Name ID Format.
- Service Provider Initiated Request Binding – Select the appropriate value based on information from IdP. Options:
- HTTP POST
- HTTP Redirect
- SAML 2.0 Settings for IdP with specific login and logout pages using the following settings
- Identity Provider Login URL
- Identity Provider Logout URL
- NOTE: These fields appear in Developer Edition orgs and sandbox orgs by default and in production orgs only if My Domain is enabled. The fields don’t appear in trial organizations or sandboxes linked to trial orgs.
- Custom Error URL – Specify the URL of the page that users are directed to if there’s an error during SAML login. It must be publicly accessible such as a Visualforce page. The URL can be absolute or relative.
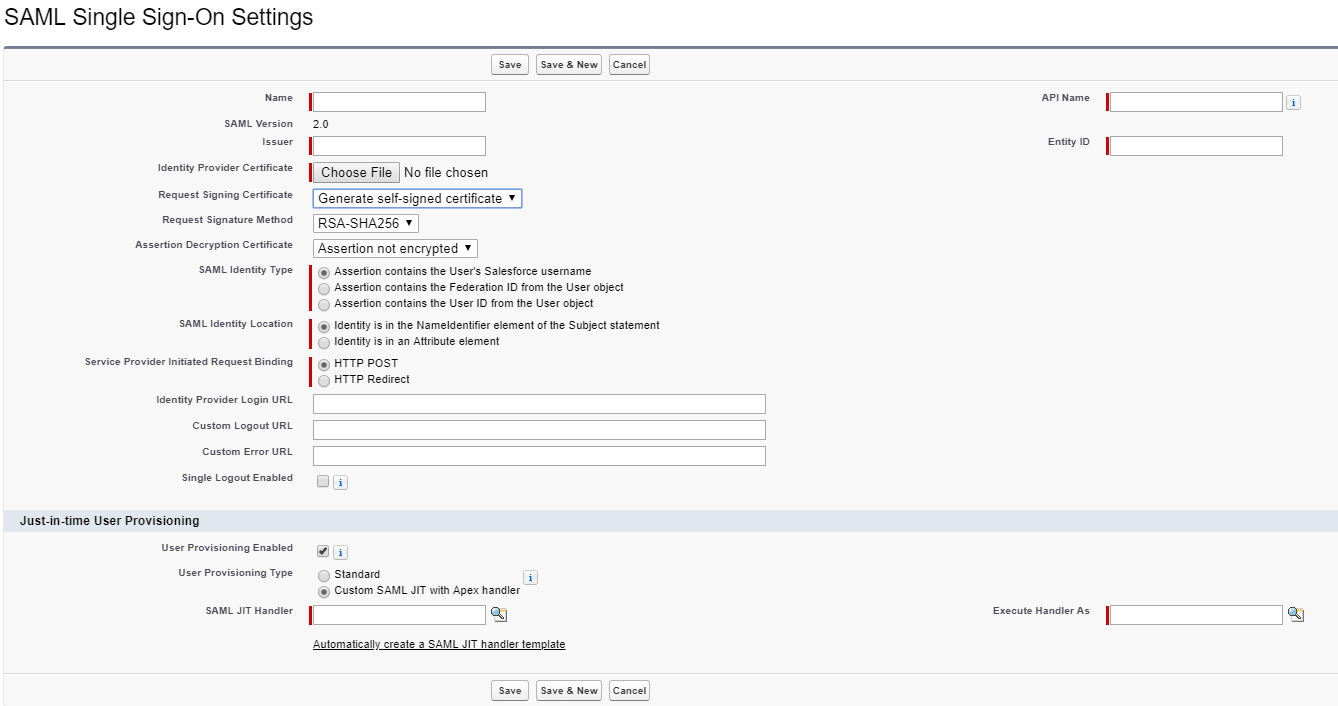
Enable Just-in-Time (JIT) User Provisioning
Just-In-Time User Provisioning lets Salesforce create a user automatically if one isn’t found when the SAML assertion is provided.
Setup Steps

- Under Single Sign-On Settings in Setup, set the following settings
- User Provisioning Enabled – Check it
- User Provisioning Type – One can choose Standard or Custom SAML JIT with Apex Handler. With Custom, one uses an Apex Class to handler the user provisioning and mapping to User fields from the assertion. One also has to specify the user to run the code as using the Execute Handler As.
- Save
NOTE: The Federation ID must be used for JIT provisioning! The UI doesn’t enforce this!
SAML JIT Handler
Edit the JIT Apex class to map fields between SAML and Salesforce. You can modify the generated code to support the following:
- Custom Fields
- Fuzzy profile matching
- Fuzzy role matching
- Contact lookup by email
- Account lookup by Account Number
- Standard user provisioning into a community
- Default profile ID usage for portal JIT provisioning
- Default portal role usage for portal JIT provisioning
- Username generation for portal JIT provisioning
NOTE: If your IdP sends JIT attributes for Contact or Account object with the User object in the same assertion, the generated handler might not be able to make updates. For a list of fields that cannot be udpated at the same time as the Contact or Account fields, see sObjects that Cannot Be Used Together in DML Operations.
Test the SSO Connection
After you have configured and saved your SAML settings, test them by trying to access the IdP’s application. Your Identity provider directs the user’s browser to POST a form containing SAML assertions to the Salesforce login page. Each assertion is verified, and if successful, SSO is allowed.
If you have difficulty signing on using SSO after you have configured and saved your SAML settings, use the SAML Assertion Validator. You might have to obtain a SAML assertion from your IdP first.
If your users are having problems using SAML to log in, you can review the SAML login history to determine why they were not able to log in and share that information with your IdP.
If you are using SAML 2.0, after you’ve finished configuring SAML, the OAUTH 2.0 Token Endpoint field is populated. Use that token with the web SSO authentication flow for OAuth 2.0.
Delegated Authentication Single Sign-On (SSO)
Salesforce lets users enter their username and password on the Salesforce login screen BUT it then issues a web service callout to an external authentication web service that you control to authenticate / verify the username and password. This lets an organization use whatever technology they wish to authenticate users such as using LDAP against a directory.
You manage authentication at the permission level, not at the org level, giving you more flexibility. This is a fancy way of saying there’s a “Is Single Sign-On Enabled” user permission that if checked, Salesforce authenticates using the web service. Otherwise, it uses the standard Salesforce Authentication.
NOTE: One must contact Salesforce support to enable this feature!
Delegated Authentication Algorithm
- When a user tries to login, either online or using the API, Salesforce validates the username and checks the user’s permissions and access settings.
- If the user has the “Is Single Sign-On Enabled” user permission, Salesforce doesn’t validate the username and password. Instead, a web services call is made to the user’s org asking it to validate the username and password.
- Note: Salesforce doesn’t store, log, or view the password. It’s disposed of immediately after the process completes.
- The web services call passes the username, password and sourceIP to your web service. Source IP is the IP address where the login request originated. You must create an implementation of the web service that Salesforce servers can access.
- Your web service validates the credentials and returns either true of false.
- If the response is true, the login process continues, a new session is generated, and the user proceeds to the app. If false, the user gets an error message that the username and password combination is invalid.
Configure Salesforce for Delegated Authentication
- Build your SSO web service. Download the “Delegated Authentication WSDL” file from the API section in Setup. Generate the SOAP service from it on the desired server(s).
- Enter Authentication URL.
- Under Single Sign-On Settings, enter the web service URL in “Delegated Gateway URL”. Allowed Ports
- 80, which accepts only HTTP Connections
- 443, which accepts only HTTPS
- 1024 – 66535, which accept either HTTP or HTTPS connections
- Under Single Sign-On Settings, enter the web service URL in “Delegated Gateway URL”. Allowed Ports
- Optinally, select “Force Delegated Authentication Callout” which forces a callout to the SSO endpoint regardless of login restriction failures. Select this option if you must record every login attempt.
- Enable the “Is Single Sign-On Enabled” permission
Important: If single sign-on (SSO) is enabled for your org, API and desktop client users can log in to Salesforce unless their profile has IP address restrictions set and they try to log in from outside of the range defined. Also the SSO authority usually handles login lockout policies for users with the “Is Single Sign-On Enabled” permission. However, if the security token is enabled for your org, your org’s login lockout settings determine how many times users can attempt to log in with an invalid security token before being locked out of Salesforce.
OAuth 2.0
OAuth (Open Authorization) is an open protocol that provides secure API authorization from applications in a simple and standardized way. OAuth can authorize access to resources without revealing user credentials to apps. App that use OAuth can also directly authenticate and access Salesforce resources without a user present.
Salesforce platform implements the OAuth 2.0 authorization framework. APIs, such as the REST, SOAP or Chatter REST API, can use OAuth 2.0 to authorize access to Salesforce resources.
OAuth 2.0 Basics
OAuth is sometimes described as a valet key for the web. A valet key restricts access to a car. A person can drive it but can’t use it to open the trunk or glove box. In the same way, OAuth give a client application restricted access to your data on a resource server. To allow access, an authorization server grants tokens to the client app in response to an authorization.
OAuth Tokens
An OAuth token is a valet key that authorizes access to resources. Quick Overview of OAuth 2.0 token types:
- Authorization Code – The authorization server creates this short-lived token and passes it to the client application via the browser. The client application sends the authorization to the authorization server to obtain an access token, and optionally, a refresh token.
- Access Token – The client uses an access token to make authenticated request on behalf of the end user. It has a longer lifetime than an authorization code, usually minutes or hours. When an access token expires, attempts to use it fail, and the app must obtain a new access token. In Salesforce terms, the access token is a session ID (SID), much like a session cookie on other systems. To use an OAuth access token to access the Salesforce web UI on behalf of a user, you can either set a SID cookie or use a “front door” URL such as https://mydomain.salesforce.com/secur/frontdoor.jsp?sid=<sid_value>. In both cases, you must include “web” in the list of requested scopes.
- Refresh token – A refresh token can have an indefinite lifetime, persisting for an admin-configured interval or until explicitly revoked. The client application can store a refresh token, using it to periodically obtain fresh access tokens. For this reason, the app must protect a refresh token against unauthorized access. Like a password, a refresh token can be used repeatedly to gain access to the resource server. Because a refresh token can expire or a user revokes it outside of the client, the client must handle failures to obtain an access token. Typically, the client replays the protocol from the start.
- ID token – OpenID Connect, an authentication layer on top of OAuth 2.0, defined an ID token as a signed data signature. The data structure contains authenticated user attributes (including a unique identifier for the user), the time when the token was issued, and an identifier for the requesting client. An ID token is encoded as a JSON web token (JWT).
Choosing an OAuth 2.0 Authentication Flow for Salesforce
As a Salesforce developer, you can use OAuth 2.0 via one of many authentication flows. When selecting the correct flow for your app, consider the use cases in this table. For details about each flow and its parameters, see each’s references.
| Authentication Flow | Description and Use Cases | References |
| Web Server | Apps hosted on a secure server use the web server authentication flow. A critical aspect of the web server flow is that the server must be able to protect the client secret. This flow uses an OAuth 2.0 authorization code grant type. | OAuth 2.0 Web Server Authentication Flow |
| User-Agent | Users can authorize a desktop or mobile application to access data using an external or embedded browser (or user agent) for authentication. These apps often use a scripting language, such as JavaScript, running within the browser. This flow uses the OAuth 2.0 implicit grant type. | OAuth 2.0 User-Agent Flow |
| JWT Bearer Token Flow | The main use case of the JWT Bearer Token Flow is server-to-server API integration. This flow uses a certificate to sign the JWT request and doesn’t require explicit user interaction. | OAuth 2.0 JWT Bearer Token Flow |
| Device Authentication Flow | Command-line apps or applications that run on devices with limited input and display capabilities, such as TVs, appliances, and other IoT devices, can use this flow. Users can connect these applications to Salesforce by accessing a browser on a device with more advanced input capabilities, such as a desktop or a smartphone. | OAuth 2.0 Device Authentication Flow |
| Asset Token Flow | Client applications use this flow to request an asset token from Salesforce for connected devices. An OAuth access token and an actor token are exchanged for an asset token. This flow combines issuing and registering asset tokens for efficient token exchange and automatic linking of devices to service cloud asset data. | OAuth 2.0 Asset Token Flow |
| SAML Bearer Assertion Flow | An app can also reuse an existing authorization by supplying a signed SAML 2.0 assertion, as specified in the SAML 2.0 Profile for OAuth 2.0 Client Authentication and Authorization Grants. A digital signature applied to the SAML assertion authenticates the authorized app. | OAuth 2.0 SAML Bearer Assertion Flow |
| SAML Assertion Flow | This flow is an alternative for orgs that are using SAML to access Salesforce and want to access the web services API in the same way. | SAML Assertion Flow |
| Username and Password | Because the username and password flow passes credentials back and forth, avoid using this flow. Use it only for testing, when a user is not present at app startup, or with highly privileged apps. In these cases, set user permissions to minimize access and protect stored credentials from unauthorized access. | OAuth 2.0 Username-Password Flow |
Considerations
- Web Server and User-Agent Flows use a Refresh Token to renew access tokens. After a client is authorized for access, it uses a refresh token to get a new access token (session id)
- When using the web server flow, you must store the client secret securely.
- Avoid the username and password flow because it transmits credentials. Other flows free the application from having to manage, store, and protect credentials.
- Salesforce communities don’t support the username-password authentication flow.
- Salesforce supports OAuth 1.0A and 2.0 authentication flows.
OAuth 2.0 Authentication Endpoints
OAuth endpoints are the URLs that you use to make OAuth authentication requests to Salesforce with Salesforce being the identity provider. The primary endpoints are
- Authorization – https://login.salesforce.com/services/oauth2/authorize
- Token – https://login.salesforce.com/services/oauth2/token
- Revoke – https://login.salesforce.com/services/oauth2/revoke
Instead of login.salesforce.com, customers can also use the My Domain, community, or test.salesforce.com (sandbox) domains in these endpoints.
OAuth 2.0 Scope Parameter Salesforce Values
The scope parameter fine-tunes the permissions associated with the tokens that you’re requesting. Scope is a subset of values that you specified when defining the connected app.
| Value | Description |
|---|---|
| api | Allows access to the current, logged-in user’s account using APIs, such as REST API and Bulk API. This value also includes chatter_api, which allows access to Chatter REST API resources. |
| chatter_api | Allows access to Chatter REST API resources only. |
| custom_permissions | Allows access to the custom permissions in an organization associated with the connected app, and shows whether the current user has each permission enabled. |
| full | Allows access to all data accessible by the logged-in user, and encompasses all other scopes. full does not return a refresh token. You must explicitly request the refresh_tokenscope to get a refresh token. |
| id | Allows access to the identity URL service. You can request profile, email, address, or phone, individually to get the same result as using id; they are all synonymous. |
| openid | Allows access to the current, logged in user’s unique identifier for OpenID Connect apps.
Use the openid scope in the OAuth 2.0 user-agent flow and the OAuth 2.0 web server authentication flow to receive a signed ID token conforming to the OpenID Connect specifications in addition to the access token. |
| refresh_token | Allows a refresh token to be returned when you are eligible to receive one. Then the app can interact with the user’s data while the user is offline, and is synonymous with requesting offline_access. |
| visualforce | Allows access to customer-created Visualforce pages. Doesn’t allow access to standard Salesforce UIs. |
| web | Allows the ability to use the access_token on the web, and includes visualforce, allowing access to customer-created Visualforce pages. |
OAuth Web Server Authentication Flow
The web server authentication flow is used by apps that are hosted on a secure server. A critical aspect of the web server flow is that the server must be able to protect the consumer secret. You can use code challenge and verifier values in the flow to prevent authorization code interception.

Redirect User to Obtain Access Authorization
To obtain authorization from the user to access Salesforce data on the user’s behalf, the client redirects the user’s browser to the authorization endpoint with the following parameters:
- response_type=code
- client_id – Consumer key from the connected app definition
- scope – A space separated list of scope values. The scope parameter fine-tunes the permissions associated with the tokens that you’re requesting. Scope is a subset of values that you specified when defining the connected app.
- redirect_uri – URI to redirect the user to after approval. This URI much match of the values in the Callback URL on the connected app. Otherwise, approval fails. This value must be URL encoded.
- state – Optional parameter that the consumer wants to have sent back to the callback url. This must also be URL encoded. Helpful for redirecting to the originally requested resource and additional security.
- immediate – Optional Boolean value that determine whether the user is prompted for login and approval. Default is value
- code_challenge – Specifies the SHA256 hash value of the code_verifier value in the token request to help prevent authorization code interception attacks. Value must also be base64url encoded once. This parameter is required only if a code_verifier parameter is specified in the token request.
- display – Optional. Changes the login and authorization pages’ display type. Salesforce supports these values:
- page – Full-page authorization screen (default)
- popup – Compact dialog optimized for modern web browser popup windows
- touch – Mobile optimized dialog such as Android and iPhone
- mobile – Mobile optimized for less capable smartphones such as BlackBerry OS 5
- login_hint – Provides a valid username value to prepopulate the login page with the username
- nonce – Optional with the openid scope for getting a user Id token. The value is returned in the response and useful for detecting replay attacks.
- prompt – Optional. Specifies how the authorization server prompts the user for reauthentication and reapproval. Salesforce supports these values
- login – The auth servier must prompt the user for reauthentication, forcing the user to log in again.
- consent – Auth server must prompt the user for reapproval before returning information to the client
- select_account –
To initiate the flow, the web server generally forma s link or sends an HTTP redirect to the browser. Example:
https://login.salesforce.com/services/oauth2/authorize?response_type=code&client_id=
3MVG9lKcPoNINVBIPJjdw1J9LLM82HnFVVX19KY1uA5mu0QqEWhqKpoW3svG3XHrXDiCQjK1mdgAvhCscA
9GE&redirect_uri=https%3A%2F%2Fwww.mysite.com%2Fcode_callback.jsp&state=mystate
If the user is logged in, Salesforce redirects the user to the approval page. If not logged in, user is asked to log in. After logging in, user is redirected to approval page. If user approves or already approved, web browser redirected to callback url with code and state. If user denies, user is redirected to callback url with state and error parameter with value “access_denied”. If error happens, error parameter returned with error code and error_description parameter returned with a description.
Web Server Exchanges Authorization Code for Access Token
On the callback url page back on the web application, it does a server side web request back to Salesforce’s token endpoint with the authorization code and client secret to get the access token, instance url, id url and other info. The access token is then used in subsequent API requests to act on the user’s behalf.
Request Parameters
- grant_type: authorization_code
- client_id – Consumer / Client Key
- client_secret – Consumer secret from the connected app. This parameter is required unless the connected app does not have “Require Secret for Web Server Flow”
- client_assertion – Instead of passing in client_secret you can choose to provide a client_assertion and client_assertion_type. If no client_secret is provided, the client_assertion and client_assertion_type are validated instead. The value of client_assertion must be a typical JWT bearer token, signed with the private key associated with the OAuth consumer’s uploaded certificate. Only the RS256 algorithm is supported.
- client_assertion_type – Provide this value when using the client_assertion parameter. The value must be urn:ietf:params:oauth:client-assertion-type:jwt-bearer
- redirect_uri – URI to redirect the user to after approval. This value must match the value in the Callback URL in the connected app definition and must be the one sent in the original authorization request.
- code – Authorization code obtained from the callback after approval.
- code_verifier – Specifies 128 bytes of random data with high enough entropy to make it difficult to guess the value to help prevent authorization code interception attacks. This parameter is required only if a code_challenge parameter was specified in the authorization request.
- format – Optional. Expected return format. This takes precedence over the accepts header. Values are
- urlencoded
- json (default)
- xml
Response Parameters On Success
- access_token – Salesforce session id that can be used with the web services API.
- token_type – Value is “Bearer” for all responses that include an access token.
- id_token – Salesforce value conforming to the OpenID Connect Specifications. Only returned if “openid” scope requested in original authorization request.
- refresh_token – Token that can be used in the future to obtain new access tokens (sessions). This value is secret. Treat it like a password, and use appropriate measure to protect it. This is only returned if your connected app is set up with a scope of at least refresh_token.
- instance_url – A URL indicating the instance of the user’s org.
- id – Identity URL that can be used to both identify the user and query for more information about the user.
- sfdc_community_url – If the user is a member of a Salesforce community, the community url is provided.
- sfdc_community_id – user’s community id if a community member
- signature – Base64-encoded HMAC-SHA256 signature signed with the client_secret (private key) containing the concatenated ID and issued_at. Used to verify that the identity URL hasn’t changed since the server sent it.
- issued_at – When the signature was created.
Response Parameters on Error
- error – Error Code
- error_description – Description of the error with additional information
OAuth User-Agent (Implicit) Flow
With the User-Agent flow, users authorize your desktop or mobile app to access their data. Client apps that run on a device or in a browser use this flow to obtain an access token. These apps can’t protect the client secret. Authentication is based on the user agent’s same-origin policy.
With the user-agent authentication flow, the client app receives the access token as an HTTP redirection. The client app request the authorization server to redirect the user-agent to another web server or to an accessible local resource. The server can extract the access token from the response and pass it to the client. For security, the token response is provided as a hash fragment on the url. It prevent the token from being passed to the server or to any other servers in referral headers.
The user-agent flow doesn’t use the client secret because the client executables reside on the user’s device, which makes the client secret accessible and exploitable.
-
- The client app directs the user to Salesforce to authenticate and authorize the app.
-
- The user approves access for this authentication flow.
- The app receives the callback from Salesforce.
Direct User to Salesforce to Obtain Access Token
To get a user’s authorization to access Salesforce data, the client directs the user to the authorization endpoint with the following parameters:
- response_type – Value can be “token”, or “id_token” with the scope parameter “openid” and a nonce parameter. If you specify “id_token”, Salesforce returns an ID token in the response.
- client id – Consumer Key from connected app.
- redirect_uri – URI to redirect the user to after approval. The URI must match one of the callback URLs in the connectedd app and the value must be URL encoded.
- state – Optional Any state that the consumer wants passed back in the response after approval.
- scope – A space separated list of scope values.
- display – Same as above
- login_hint – Same as above
- nonce – Same as above
- prompt – Same as above.
Response Parameters
-
- access_token – Salesforce Session ID that can be used with Salesforce APIs.
- token_type – Value is “Bearer” for all responses that include an access token
-
- id_token—Salesforce value conforming to the OpenID Connect specifications. The token is returned only if theresponse_type is token id_token with the scope parameter openid and a nonce parameter.
-
- refresh_token—Token that can be used in the future to obtain new access tokens (sessions). This value is a secret. Treat it like the user’s password, and use appropriate measures to protect it.
-
- instance_url—A URL indicating the instance of the user’s org. For example: https://yourInstance.salesforce.com/.
-
- id—Identity URL that can be used to both identify the user and query for more information about the user. See Identity URLs.
-
- sfdc_community_url—If the user is a member of a Salesforce community, the community URL is provided.
-
- sfdc_community_id—If the user is a member of a Salesforce community, the user’s community ID is provided.
-
- signature—Base64-encoded HMAC-SHA256 signature signed with the client_secret (private key) containing the concatenated ID and issued_at. Used to verify that the identity URL hasn’t changed since the server sent it.
- issued_at—When the signature was created.
error and error_description returned if there’s an error or user denies.
OAuth JWT Bearer Token Flow
The main case of the JWT Bearer is server-to-server API integration. This flow uses a certificate to sign the JWT request and doesn’t require explicit user interaction.
The JWT bearer token is similar to a refresh token flow within OAuth. The JWT is posted to the OAuth token endpoint, which in turn processes the JWT and issues an access_token based on prior approval of the app. Hoever, the client doesn’t need to have or store a refresh_token, nor is a client_secret required to be passed to the token endpoint.
JWT bearer flow supports the RSA SHA256 algorithm, which uses an uploaded certificate as the signing secret. The certificate size can’t exceed 4KB.
General Steps
The OAuth 2.0 JWT bearer token flow involves the following general steps.
-
- The developer creates a connected app or uses an existing one and can optionally register an X509 Certificate. The certificate corresponds to the private key of the app. When the connected app is saved, the Consumer Key (OAuth client_id) and Consumer Secret are generated and assigned to the app.
-
- The developer writes an app that generates a JWT and signs it with the certificate.
-
- The JWT is posted to the token endpoint https://login.salesforce.com/services/oauth2/token or, if implementing for a community, https://acme.force.com/customers/services/oauth2/token (whereacme.force.com/customers is your community URL).
-
- The token endpoint validates the signature using the certificate registered by the developer.
-
- The token endpoint validates the audience (aud), issuer (iss), validity (exp), and subject (sub) of the JWT.
- Assuming that the JWT is valid and that the user or admin authorized the app previously, Salesforce issues an access_token.
Note: Refresh Token never used in this flow.
JWT Bearer Token Parameters
- iss – Must be the OAuth client_id
- aud – Must be one of the following
- https://login.salesforce.com
- https://test.salesforce.com
- your community url
- sub – The subject must be the username of the desired user or community user.
- exp – The validity must be the expiration time of the assertion within 5 minutes, expressed as the number of seconds from 1970-01-01T0:0:Z measured in UTC.
- JWT must be signed using RSA SHA256.
- JWT must conform with the general format rules specified here: http://tools.ietf.org/html/draft-jones-json-web-token.
Post Parameters
- grant_type – urn:ietf:params:oauth:grant-type:jwt-bearer
- assertion – JWT bearer token
- format – Format of the response can be specified as an OAuth flow using the token parameter, or an HTTP Accepts header
- scope – Scope isn’t supported in this flow. The value for this parameter is the combination of scopes from previous approvals.
Response
Same response as authorization_code flows without a refresh_token. Salesforce looks at all the previous approval for the user that include a refresh_token. If matching approvals are found, the values are combined and an access_token issued. If no previous approvals include a refresh token, no approved scopes are available, and the request fails as unauthorized.
OAuth Device Authentication Flow
Command-line apps or applications that run on devices with limited input and display capabilities such as TVs, appliances, and other IoT devices, can use this flow. Users can connect these applications to Salesforce by accessing a browser on a device with more advanced capabilities, such as a desktop or a smartphone.
General Steps
-
- The device requests authorization from Salesforce.
-
- Salesforce verifies the request and returns the following: human-readable user code, verification URL, device code, and minimum polling interval (in seconds).
-
- The device displays the user code and instructs the user to enter it at the specified verification URL.
-
- On a separate device that has more developed input capabilities, such as a desktop computer or smartphone, the user opens a browser.
-
- The user navigates to the verification URL and is prompted to enter the user code.
-
- If the code is valid, the user is prompted to log in if not already logged in.
- After successful login, the user is prompted to allow the device to access Salesforce data.
-
- On a separate device that has more developed input capabilities, such as a desktop computer or smartphone, the user opens a browser.
-
- After displaying the user code and verification URL, the device starts polling the token endpoint for authorization. Polling frequency can’t exceed the minimum polling interval. The device continues polling until the user has allowed (or been denied) access, or until the user code has expired.
-
- If allowed, the authorization server returns to the device an access token, a refresh token if requested, and other information.
- After the access token is granted, the device can use it in API requests to access data on the user’s behalf. The device uses a refresh token to get a new access token if the access token becomes invalid.
Device Initiates Authentication Flow
client application on the device POSTs to the token endpoint with the following parameters:
- response_type – “device_code” for this flow
- client_id – Consumer key from the connected app
- scope – Optional. Lets you pass any scopes defined in the connected app
Response Parameters
- device_code – Verification code for the device. Valid for 10 minutes
- user_code – Verification code fo rthe end user. 8-digit alphanumeric code to be entered at the verification URI. Valid for 10 minutes
- verification_uri – End-user verification URI on the authorization server. If your org has a My Domain or community sub-domain, the verification_uri reflects the subdomain that initiated the flow.
- interval – Minimum number of seconds we recommend waiting between polling requests to the token endpoint.
User Authenticates and Authorizes While Device Polls the Token Endpoint
The user visits the verification url specified by the device on another device and enters the code supplied. After successful login, the user is prompted to allow the device to access Salesforce account data.
Device Polling Request Parameters
- grant_type – “device”
- client_id – Consumer key from connected app.
- client_secret – Optional. Not required for device flow
- code – The authorization code that the client later exchanges for an access token.
Salesforce Responds with Access Token Response
If the user has authorized, the response from Salesforce contains a success message and returns the access token along with other values.
- access_token – Session ID
- refresh_token – A refresh token
- signature
- scope
- instance_url
- id
- token_type – “Bearer”
- issued_at
OAuth Asset Token Flow
Client applications use this flow to request an asset token from Salesforce for connected devices. An OAuth access token and an actor token are exchanged for an asset token. This flow combines issuing and registering asset tokens for efficient token exchange and automatic linking of devices to service cloud asset data.
General Steps
-
- Create a new connected app or use an existing one that has asset tokens enabled and required settings configured.
-
- Get an access token so that you can request an asset token.
-
- Create your asset token request.
-
- Understand how Salesforce attempts to register a new or existing Asset using information from the actor token.
-
- Create your asset token request.
-
- Post your asset token request to the token endpoint.
- If the asset token JWT is valid, Salesforce issues your asset token in an access token response and publishes an asset token event.
Create Your Asset Token Request
After an access_token is acquired, use this token request to get an asset token. The request includes
- grant_type – Required. Value must be “urn:ietf:params:oauth:grant-type:token-exchange”.
- subject_token_type – Required. Value must be “urn:ietf:params:oauth:token-type:access_token”.
- subject_token – Required. Value must be your access token.
- actor_token_type – Optional unless actor_token is specified. Value must be “urn:ietf:params:oauth:token-type:jwt”.
- actor_token – Optional. Value must be a JWT containing metadata about your Asset (new or existing).
Bunch of other info…… To Do….
OAuth SAML Bearer Assertion Flow
An app can also reuse an existing authorization by supplying a signed SAML 2.0 assertion, as specified in the SAML 2.0 Profile for OAuth 2.0 Client Authentication and Authorization Grants. A digital signature applied to the SAML assertion authenticates the authorized app.
The OAuth SAML Bearer assertion flow is similar to a refresh token within OAuth. The SAML assertion is posted to the OAuth token endpoint, which in turn processes and issues an access_token based on prior approval of the app. However, the client isn’t required to have or store a refresh_token, nor is a client_secret required to be passed to the endpoint.
General Steps
-
- The developer creates a connected app and registers an X509 Certificate. This certificate corresponds to the private key of the app. When the connected app is saved, a consumer key (OAuth client_id) is generated and assigned to the app.
-
- The developer writes an app that generates a SAML assertion and signs it with the private key.
-
- The SAML Bearer assertion is posted to the token endpointhttps://login.salesforce.com/services/oauth2/token,https://test.salesforce.com/services/oauth2/token, orhttps://your_community_URL/services/oauth2/token (if implementing for a community).
-
- The token endpoint validates the signature using the certificate registered by the developer.
-
- The token endpoint validates the audience, issuer, subject, and validity of the assertion.
- Assuming that the assertion is valid and that the user or admin authorized the app previously, Salesforce issues an access token.
Note: A refresh token is never used in this flow.
See the Source for more info.
OAuth SAML Assertion Flow
This flow is an alternative for orgs that are using SAML to access to access Salesforce and want to access the web services API in the same way. You can use the SAML Assertion flow only inside an org. You don’t have to create a connected app to use this assertion flow. Clients can use this assertion flow to federate with the API using a SAML assertion, the same way they federate with Salesforce for web single sign-on.
NOTE: Communities doesn’t support this!
General Steps
-
- Configure SAML for your org. SAML version 2.0 is required.
-
- Exchange a SAML assertion for an access token.
-
- Salesforce sends the response.
- Use a JSON parser to process the response and extract the access_token.
See the Source for more info.
OAuth Username and Password Flow
Because the username and password flow passes credentials back and forth, avoid using this flow. Use it only for testing, when a user is not present at app startup, or with highly privileged apps. In these cases, set user permissions to minimize access and protect stored credentials from unauthorized access.
General Steps
-
- he consumer uses the user’s username and password to request an access token (session ID.)
- After the request is verified, Salesforce sends a response to the client.
Request an Access Token
This flow does not support including scopes in the request, and the access token return from this flow does not get scopes. Consumer makes an out-of-band request to the token endpoint with the following parameters:
- grant_type – Value must be “password”
- client_id – Consumer key from connected app
- client_secret – Consumer secret from connected app
- username – User’s username
- password – User’s password.
- NOTE: The security token must be appended to the password!
- format – Optional. Expected return format. Values are
- urlencoded
- json (default)
- xml
Response
Usual access token response values. Response doesn’t send a refresh token!
SSO Login Setting Tips
- Use “Is Single Sign-On Enabled” user permission to force the specified users to authenticate using the specified SSO provider. Have to contact Salesforce to enable Delegated Authentication but you don’t have to configure Delegated Authentication.
- System Admins should always be able to log in to Salesforce in case there’s an SSO outage.
Secure Coding SSO
To prevent interception and Man-In-The-Middle attacks from a client app, the client app should use the following security measures:
- Use TLS / SSL and ensure the certificate is a valid Salesforce.com certificate
- Validate the API Partner Server URL using the regular expression below:
- Validation Regular Expression: https://[^/?]+\\.(sales|visual\\.)force\\.com/services/(S|s)(O|o)(A|a)(P|p)/(u|c|m)/.*
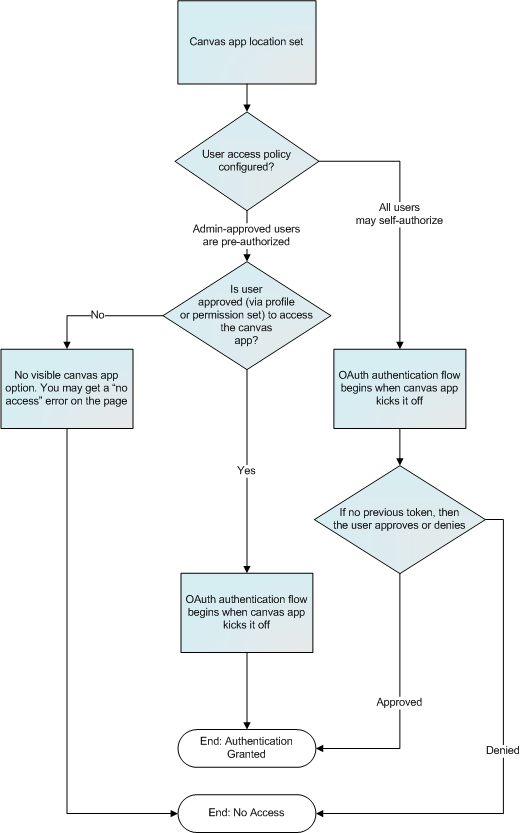
Canvas Authentication Options
- Signed Request Authentication – Default authorization method for canvas apps.
- OAuth Authentication
- SAML SSO
Canvas App User Flow — Signed Request
Canvas OAuth Authentication
Canvas supports OAuth 2.0 for authorization. When using OAuth, you have two options:
- Web Server OAuth Authentication Flow – When users run your canvas app, they can authorize the app to access their data. This requires each user to allow the canvas app to access their information.
- User-Agent OAuth Authentication Flow – When users run your canvas app, they can authorize the app to access their data by using just the browser for authentication. Like Web Server OAuth authentication, this options requires each user to allow the canvas app to access their information.
Two-Factor Authentication
As a Salesforce admin, you can enhance your org’s security by requiring a second level of authentication for every user login. You can also require two-factor authentication when a user meets certain criteria, such as attempting to view reports or access a connected app.
Salesforce Identity Verification
When a user logs in from outside a trusted IP range and uses a browser or app we don’t recognize, the user is challenged to verify identity. We use the highest priority verification method available for each user. In order of priority, the methods are:
- Verification via push notification or location-based automated verification with the Salesforce Authenticator mobile app (version 2 or lated) connected to the user’s account.
- Verification via a U2F security key registered with the user’s account.
- Verification code generated by a mobile authenticator app connected to the user’s account.
- Verification code sent via SMS to the user’s verified mobile phone.
- Verification code sent via email to the user’s email address.
After identification is successful, the user doesn’t have to verify identity again from that browser or app, unless the user:
- Deletes browser cookies or browses in private or incognito mode.
- Deselects “Don’t ask again” on the identity verification page
Org Policies That Require Two-Factor Verification
You can set policies that require two-factor authentication on
- Every Login
- Every Login through the API (for developers and client applications)
- Accessing specific features
If users lose or forget the device they usually use for two-factor authentication, you can generate a temporary verification code for them. You set when the code expires, from 1 to 24 hours after you generate it. Your user can use the code multiple times until it expires. A user can have only one temporary code at a time. If a user needs a new code while the old code is still valid, you can expire the old one, then generate a new one. Users can expire their own valid codes in their personal settings.
Customizing User Authentication with Login Flows
Join us to learn how to use Login Flows to completely customize your login experience, integrate with different two-factor authentication methods, leverage identity verification services, and more.