This is the Sales Cloud study guide I created for myself but hope that it helps you too. All the content that follows was written from various sources since it helps me to remember which is why this is so long.
Since I had previously failed the exam about a year ago, I studied extra hard in the areas needing the most attention, opportunity management and sales productivity so that’s where most of this content is focused.
Let me know in the comments if this helped and good luck!
Test Result – Pass!
This time around felt a lot easier. There were some questions on territories and forecasting but nothing too in-depth and nothing for Customizable Forecasts but that doesn’t mean there won’t be for now.
Resources
- Exam Guide
- Salesforce Memo
- Sales Cloud Basics Help Docs
- SFDC Trail Blog
- Jesse Altman Blog Post
- CertifiedForce
- Quizlet
- A guide to sharing architecture book
- Forecasting & Territory Management Video
- Sales Cloud Basics Documentation
- Developer Strategies from the Territory Management Trenches
- Slide Share
- Salesforce Chris Resource Guide
- Original Territory Management Implementation Guide
- Enterprise Territory Management Implementation Guide
- Enabling Multiple Currencies Blog Post
Exam Outline
Industry Knowledge – 5 %
- Explain the factors that influence sales metrics, KPIs and business challenges.
- Explain common sales processes and key considerations.
Implementation Strategies – 6%
- Given a scenario, determine how to facilitate a successful consulting
engagement (plan, gather requirements, design, build, test, and document). - Given a scenario, determine appropriate sales deployment considerations.
- Given a scenario, measure the success of a Sales Cloud implementation
project.
Sales Cloud Solution Design – 25%
- Given a set of requirements, design an end-to-end sales process from lead to opportunity to quote to close to order.
- Given a scenario, analyze customer requirements to determine an appropriate solution design considering capabilities, limitations, and design trade-offs.
- Given a scenario, identify an appropriate approach when designing the lead conversion process.
- Describe the implementation considerations when designing a sales process. (validation rules, process builder, automation, record types, page layouts, workflow, Visualflow and triggers).
- Given a scenario, determine when it is appropriate to include custom
application development or a third-party application. - Describe the appropriate uses cases for Account and Opportunity Teams and the effect on sales roles, visibility, access, and reporting.
- Explain the capabilities and use cases for Enterprise territory management.
- Explain the capabilities, use cases and design considerations when
implementing Orders. - Explain the capabilities, use cases and design considerations of Salesforce mobile applications pertinent to the sales process.
Marketing & Leads – 7%
- Explain how marketing capabilities support the sales process
- Given a scenario, recommend appropriate methods for lead scoring and criteria for lead qualification
- Explain the best practices for managing lead data quality
Account and Contact Management – 12%
- Identify use cases and design considerations for social accounts and contacts
- Explain how the ownership of account and contact records drive visibility of related sales information such as opportunities, activities, etc.
- Explain the various methods for establishing relationships between accounts and contacts.
- Explain the impact of having an account hierarchy.
- Explain the methods for populating and maintaining account and contact data using data enrichment tools.
- Explain the use cases and implications for implementing person accounts.
Opportunity Management – 15%
- Given a set of requirements, determine how to support different sales process scenarios.
- Given a scenario, determine the relationships between sales stages, forecast and pipeline
- Describe the relationship between opportunities to assets, product line items and schedules, price books, quotes, contracts, campaigns, etc.
- Given a set of requirements, determine the appropriate forecasting solution.
- Describe the impact of multi-currency on opportunities.
Sales Productivity – 12%
- Given a scenario, determine the key features that help to enable and measure sales productivity and adoption.
- Identify use cases and considerations for using email and productivity tools.
- Given a scenario, identify the appropriate mobile solution to improve sales productivity.
- Describe how chatter enables collaboration in the sales process.
- Explain the use cases and best practices for using Content vs Chatter Files in the sales process.
- Explain the capabilities and use cases of work.com pertinent to sales productivity.
Communities & Site Management – 5%
- Explain the uses cases for Communities and sites in the sales process. (Customer, Partner, Ideas, Force.com Sites, etc)
- Identify the impact of enabling Communities.
Sales Cloud Analytics – 5%
- Given a set of desired metrics, determine the appropriate report, dashboard, or reporting snapshot solution.
- Describe the implementation considerations of multi-currency on reports and dashboards.
Integration and Data Management – 8%
- Explain the use cases and consideration for integrations common to Sales Cloud implementations.
- Explain the use cases and considerations for data migration in Sales Cloud.
- Given a scenario, analyze the implications and design considerations of large data and transaction volumes.
Industry Knowledge
- Explain the factors that influence sales metrics, KPIs and business challenges.
- Explain common sales processes and key considerations.
Sales Processes
In Salesforce, you can set up separate sales processes for each type of sale you make. For example, Cloud Kicks may have one sales process to handle standard reatail orders for large quantities of shoes, and a separate process for small, custom shoe orders. Setting up each process takes several steps.
- Create the opportunity stages needed in the sales process.
- Name the sales process, and select which opportunity stages are included.
- Optionally, create an Opportunity page layout specific to the process.
- Create a record type for the sales process. Record types link the sales process to the page layout that goes with it.
Contact Roles on Opportunities
Contact Roles for opportunities tell you which contacts you’re dealing with for the opportunity, and how each is related to the opportunity. You can also link contacts from other accounts to the opportunity using contact roles.
Contact Roles can be linked to contacts or person accounts. One can also specify a “Primary” contact for this opportunity.
Sell as a Team With Opportunity Team
Adding an opportunity team helps team members work together and track the opportunity’s progress.
They are a bit like Account Teams. Both allow you to relate particular people at your company to accounts or opportunities. But where Account Team members can be expected to form a long-term relationship with the customer, an Opportunity Team is a temporary group composed of people who can help you close the deal. Being a part of the Opportunity Team gives the team members special visibility into the opportunity, such as updates on Chatter. Another feature is Opportunity Splits to incentivize team members to complete the deal.
Enable Team Selling
- From Setup, enter Opportunity Team Settings and select them.
- Check Enable Team Selling.
- Save
- Select which page layouts to include opportunity teams.
- Optionally, to add the Opportunity Team related list to all opportunities for all users, select “Add to users’ customized related lists”.
- Save.
Add or Edit Team Roles
If the roles provided don’t match how your company’s sales process works, you can add new roles or change the existing ones.
- From Setup, Customize | Opportunities | Opportunity Teams | Fields.
- Click “Team Role”
- In the Team Role Picklist Values area, do one of the following:
- Click New to create a new role
- Click Rename to give an existing role a different name.
- Save
Guidelines for Setting Up and Adding a Default Opportunity Team
Save time by setting up a default opportunity team – a group of co-workers who you typically work with on opportunities. Then add the team to opportunities that you own. If you’re working with a default opportunity team, refer to these guidelines for additional information. Available in Lightning and Classic and in Enterprise, Performance, Unlimited, and Developer editions.
- To set up a default opportunity team, access Advanced User Details in your personal settings.
- While you’re defining your default opportunity team, you can choose to automatically add it to all your open opportunities. If you don’t choose this option, you add the default team from the opportunity team relatd list of your opportunities.
- Clicking Add Default Team adds the default team of the opportunity owner, not the user who clicks the button.
- Salesforce admins and users above you in the role hierarchy can add your default opportunity team to opportunities that you own.
Guidelines for Using Opportunity Teams
- Only the opportunity’s owner or users above the owner in the role hierarchy can add, edit, or delete opportunity team members.
- Save time by including users you normally work with on opportunities on your default opportunity team. You can choose to add your default opportunity team to all your opportunities automatically.
- Changes that you make to the opportunity team on an opportunity don’t affect your default opportunity team or the opportunity teams on your other opportunities.
- If your Salesforce admin has enabled Opportunity Splits, you can split credit for an opportunity among members of an opportunity team.
- When the Org-Wide Default for accounts and opportunities is set to private, you can manually share records to give access to other users. When a user has access to an account through manual sharing, the user also gets read-only access to the account’s opportunities. If a user has access to the account’s opportunities as part of an opportunity team, then manually removing the user’s access to the account automatically removes the user from any related opportunity teams.
- You can’t use opportunity teams for private opportunities.
Assets
While products represent the items that your company sells, assets represent the specific products your customers have purchased. Use assets to store information about your customers’ products.
Available in Classic and Lightning
Available in Professional, Enterprise, Unlimited & Developer Editions
Assets have a serial number, purchase date, and other information related to an individual sale. Depending on hor your organization uses assets, they can represent competitor products that your customers have or versions of your products.
View and manage assets from the Assets tab. Depending on your page layout, you can also view lists of related assets on account, contact, product, and location page layouts.
You can create asset hierarchies to represent products with multiple components, and view a tree grid of an asset’s hierarchy on its detail page. On the support side, assets can be linked to cases, work orders, maintenance plans, entitlements, and contract line items, making it easy to see an asset’s history from production to retirement.
Asset Fields
- Account (AccountId) – Lookup to Account
- Asset Level (AssetLevel) – Number(9,0)
- Asset Name (Name) Text(255)
- Asset Provided By (AssetProvidedById) – Lookup to Account
- Asset Serviced By (AssetServicedById) – Lookup to Account
- Competitor Asset (IsCompetitorProduct) – Checkbox
- Contact (ContactId) – Lookup to Contact
- Description (Description) – Long Text Area (32000)
- Install Date (InstallDate) – Date
- Internal Asset (IsInternal) – Checkbox
- Parent Asset (ParentId) – Lookup to Asset
- Price (Price) – Currency (18, 0)
- Product (Product2Id) – Lookup to Product
- Product Code (ProductCode) – Text(255) – Inherited from Product record
- Product Description (ProductDescription) – Text(4000) – Inherited from Product record.
- Product Family (ProductFamily) – Picklist – Inherited from Product
- Product SKU (StockKeepingUnit) – Text(180)
- Purchase Date (PurchaseDate) – Date
- Quantity (Quantity) – Number(10,2)
- Root Asset (RootAssetId) – Lookup to Asset
- Serial Number (SerialNumber) Text(80) Indexed
- Status (Status) – Picklist
- Shipped
- Installed
- Registered
- Obsolete
- Purchased
- Usage End Date (UsageEndDate) – Date
Asset Sharing
Under Asset Settings, there’s an “Enable Asset Sharing” checkbox. If it’s unchecked, asset access is determined by the parent object’s sharing rules. If it’s checked, sharing rules control user access to assets.
If checked, one can specify the default asset owner as either
- Creator of the asset OR
- Owner of the parent account
Asset Considerations
- A product must be linked to a contact, account or both. This is a system requirement.
- You can enter person accounts in either the Account or Contact field of an asset. The “Assets” related list on a person account includes all assets related to the person account.
- If you enter an account and a contact that aren’t related, the contact’s account won’t list the asset in its Assets related list.
- If asset sharing is set to the “Controlled by Parent” – the default setting – the account field, Contact field, or both must be completed for an asset to be saved. If asset sharing is not set to Controlled by Parent, assets can be saved without an associated account or contact.
- Deleting a product does not delete any asset records associated with it.
- Deleting an account or contact deletes all associated assets. If you delete an account with a related contact that is associated with an asset, all three records are deleted. Restoring the account restores all three records.
- Assets associated with cases can’t be deleted. This means accounts or contacts that are associated with an asset listed on a case also can’t be deleted.
- If you delete an asset with both a parent asset and child assets, its parent and children are no longer linked in the asset hierarchy.
- The asset hierarchy isn’t searchable or editable
- The asset hierarchy isn’t viewable in communities, Salesforce mobile web, Salesforce for iOS, Salesforce for Android, or the Field Service Lightning mobile app.
- The “View Asset Hierarchy” action appears only on assets that are part of a hierarchy, and is available only for hierarchies of 500 or fewer assets. If a hierarchy contains more than 500 assets, you can still refer to each asset’s Child Assets related list and Parent Asset, Root Asset, and Asset Level fields.
Products
Product are the items and services that you sell to customers. Each product can exist in multiple price books with different prices.
When you view the detail page of an opportunity, quote, order, or service contract, the Products related list or the Quote Line items related list shows the associated products for that record. Use these related lists to choose a price book for the record, add or edit products, and for opportunities, establish or edit product schedules. For example, on a quote detail page, click “Add Line Item” on the Quote Line Items.
Product Guidelines
- To view and create products, you need the “Read” and “Create” permissions on products.
- To get started created products, click New on the products home page.
- You can creat a product by cloning a product.
- To Ensure fast system performance with price books, keep the number of products below 2,000,000.
- Inactive products don’t appear in searches for users whose proile allow only Read access to products.
- Products need a standard active price before you can add them to a price book.
- To define a payment and delivery cycle via a product schedule, click Edit above the product detail.
Set and Edit Product Prices in Classic
Set Standard Prices
- Select a product
- On the product detail page, click “Add” from the standard price related list. If you’ve already added a standard price, Click Edit to change it or Edit All to edit all standard prices in other currencies.
- Enter the standard price
- Select Active to make this price available to products on opportunities, quotes, or other custom price books.
- Save. The standard price is automatically associated with the product in your standard price book.
Set List Prices
- Select a product.
- On the product detail page, click Edit from the Price Books related list next to the custom price book that will contain the list price.
- Enter the list price.
- Select Active to make this price available to product on opportunities and quotes.
- Save.
Organize Products with Product Families
Use the product family picklist to categorize your products. For example, if your company sells both hardware and software, you can create two product families: Hardware and Software
Available in Lightning and Classic
Available in Professional, Enterprise, Performance, Unlimited & Developer Editions
If your organization uses forecasting, your users can have a different quota for hardware sales and software sales. Users can also view forecasts for opportunities with hardware products separate from opportunities that include software products.
To begin using product families:
- Customize the product family picklist to include the different categories of products you sell.
- For each product in your price books, edit the product and select the appropriate Product Family.
- If your organization uses forecasting, set a different quota for each product family for your users.
- If your organization uses Customizable Forecasting, consider changing your forecast settings to display a particular forecast family value by default when your users click the Forecasts tab.
Considerations for Setting Prices
Price Types Available
- Standard Price – Default price associated with a product. It’s automatically included in the standard price book.
- List Price – Custom price that you associate with a product in a custom price book.
- Sales Price – Actual prices that sales reps specify for the products that they add to opportunities and quotes. Sales prices can be the same as the list prices from the price book that’s used for the opportunity or quote, or they can include discounts or other modifications.
Other Considerations
- Before you can add a new product to an opportunity, quote, or custom price book, add a standard price to the product and mark it active. This is the default pricing of the product.
- Before you can assign list prices for products, create custom price books. List prices are available to use when you add products to an opportunity or quote from a custom price book.
- You can expand the format of your price fields up to 8 decimal places. To change this, contact Salesforce.
Product Schedules
Use Product Schedules to determine the payment and delivery cycles for products that are paid or delivered over time.
Available in Classic and Lightning
Available in Professional, Enterprise, Performance, Unlimited and Developer Editions
- Quantity Schedule – determines when a product is delivered
- Revenue Schedule – determines when a product is paid for.
- Default Schedule – associated with a specific product in a specific price book. Every time the product is added to an opportunity, the default schedule is used. You can override the default schedules on any opportunity.
You determine which types of schedules your reps can use and which types of schedules can be established for each individual product.
- Quantity schedule is suitable if your customers pay once but receive the product in increments. For example, as with an annual magazine subscription for a monthly magazine. A quantity schedule defines the dates, number of units, and number of installments for payments, shipping, or other use as determined by your company.
- A revenue schedule is suitable if your customers make regular payments but receive the product once. For example, if you sell customized products that are charged in installments but delivered once. A revenue schedule defines the dates, revenue amounts, and number of installments for payments, recognizing revenue, or other user.
- A default schedule is suitable if all your customers make product payments on the same timetable or you deliver products on a regular schedule. If you typically customize schedules, there’s no advantage to create default schedules.
When you enable customizable product schedules, the Salesforce Classic actions on product schedules are disabled, and Line Item Schedule is added to the object manager.

Product Schedule Considerations
When you enable customziable product schedules the following applies:
- Insert or delete apex triggers that you’ve applied to schedules are invoked immediately.
- Line Item Schedule is unavailable in Process Builder and workflow.
- You can use custom fields and customize the layout in default product schedules, but if you’ve applied validatin rules or apex triggers, they’re bypassed when they’re first inserted.
Considerations for Using Default Product Schedules
- If you add or change a product schedule, opportunities with that product aren’t updated. If a product has a default quantity schedule and a default revenue schedule, the quantity schedule is calculated first to determine the total product revenue. Then the revenue product schedule is applied to that amount.
- If you have a quote line item with a discount, and the corresponding product record has a default schedule, you can’t edit the discount field.
- If a product has default schedules established on the product, the schedules are automatically created when you add the product to the opportunity. The dates of the installments begin with the date that you specified when adding the product. If you didn’t specify a product date, the installment dates begin with the opportunity close date.
Opportunities
Opportunities are deals in progress. Opportunity records track details about deals, including which accounts they’re for, who the players are, and the amount of potential sales. If your organization uses leads, an opportunity is created when a lead is converted. Opportunities can also be created directly for accounts you’re working. As your deals progress toward the Proposal stage:
- Add products and attach files, such as contracts or data sheets.
- Log the calls you make.
- Use Notes to jot down things during customer meetings.
- Create tasks for key activities and calendar events for client meetings.
- Send email to the opportunity contact or other key decision-makers.
During negotiation, share sales strategies with colleagues or to ask your manager for targeted guidance using Chatter. As you drive your deal from one stage to the next, update the opportunity record with the current stage. You’ll be closing deals in no time.
Similar Opportunities
Allow users to find Closed/Won opportunities that match the attributes of an opportunity they’re currently working on, so they can quickly access information that might help them close their open deals.
Available in Classic
Available in Enterprise, Performance, Unlimited and developer editions for orgs activated after Summer ’09.
- From Setup, enter Similar Opportunities in the Quick Find box, then select Similar Opportunities.
- Click Edit.
- Select Enable Similar Opportunities.
- Select the fields or related lists that you want Similar Opportunities searches to match against, and then click Add.
- Select the fields to display in the Similar Opportunities related list.
- Click Save.
- Make sure the Similar Opportunities related list is added to the opportunity page layout.
Activate Big Deal Alerts
Your organization can use alerts that automatically send an email notification for opportunities with large amounts. You can activate one opportunity alert for your organization. The alert message resembles the opportunity detail page including the page layout and language from a selected user.
Before you begin, you may want to decide which user has the page layout and language settings that you would like included in all alerts. This user must also have the “View All Data” permission.
Review an Opportunity’s History
Field History lets you track the changes made to an opportunity, including changes to the stage, so you can quickly see who changed the opportunity and when.
There are two related lists that track changes to the fields on an opportunity record.
- Opportunity Field History
- Any time a user modifies any of the standard or custom opportunity fields that are set to be tracked, a new entry is added to the Opportunity Field History related list. All entries include details of the change and who made it. Your administrator can choose which fields to track.
- Stage History
- Any time a user changes the Amount, Probability, Stage, or Close Date fields, a new entry is added to the Stage History related list. All entries include details of the change and who made it. Your administrator can’t choose which fields to track.
Changes to the Amount and Quantity fields are tracked even when the field is updated as the result of a change to an opportunity’s products or schedules.
Considerations for Adding Products to Opportunities
- The opportunity Amount is the sum of the products that you add to the opportunity. You can’t edit the Amount unless you delete the products from the opportunity.
- The total price is the quantity multiplied by the sales price.
- You can add products with schedules in Lightning Experience or the Salesforce app, but must switch back to Salesforce Classic to enable product schedules, or to establish or modify schedules for products.
- For multicurrency orgs, the opportunity Currency is tied to the currency of the associated price book entry. You can’t edit the Currency unless you delete the products from the opportunity.
- In Lightning Experience, users aren’t prompted to add products when creating an opportunity from a related list based on a custom lookup field.
Quotes
Make it easy for your sales reps to show your customers the prices of the products and services that your company offers.
Available in Classic and Lightning
Available in Professional, Enterprise and Unlimited Editions.
To Enable Quotes
- From Setup, enter Quote in the Quick Find then select Quote Settings
- Select the option for enabling quotes.
- Add the “Quotes” related list to the desired opportunity page layouts.
- Save
Quote Templates
Quote templates let you customize the way your sales reps quote your company’s products and services. Sales reps can select standard or customized quote templates from their quote records, generate quote PDFs, and email them to customers.
Quote Synching
Quote synching lets you link a quote to the opportunity that it was created from and sychronize all updates between the two records. An opportunity can have multiple quotes, but it can sync with only one quote at a time.
While a quote and an opportunity are synched, any addition or change to the list of products in one record syncs with the list of products in the other. Adding or remove a line item from a quote updates the synched opportunitie’s Products related list. Adding or removing a product from the opportunity updates the synched quote’s Quote Line Items related list. Product sorting also syncs between the two records. The quote and opportunity continue to sync each way until you stop synching or delete one of the records.
You can sync quotes and opportunities that don’t have any products.
If an opportunity and a quote are synched, the opportunity identifies the synched quote in the following places:
- The Synched Quote field on the Opportunity detail page.
- The Synching checkbox in the Quotes related list.
You can’t edit the opportunity’s Amount field, even if you stop syncing.
If you replace the synced quote with another synced quote, the existing opportunity line items are replaced by the newly synced quote records.
If you stop syncing, the link is broken and the records are no longer automatically updated with each other’s changes.
Contracts
Customize Salesforce to handle your internal contract management process.
Available in Lightning & Classic
Available in Professional, Enterprise, and Unlimited editions with Sales Cloud.
Settings
- Auto-Calculate Contract End Date
- Send Contract Expiration Notice Emails to Account and Contract Owners
- Track History for All Statuses – The default is to track history for contracts with a status of In Approval Process or Activated. To track history for contracts for all statuses, select Track History for All Statuses, and then save your changes.
Example

Track what you’re selling by adding products to your customers’ order records.
Things to Know About Contracts
- The Start Date (required)
- How long the contract will be in effect: the term in months (required)
- The end date
Some admin configure Salesforce to calculate the contract end date based on the contract start date and contract term. If the contract end date is calculated, it doesn’t appear on the contract’s edit page.
Orders
Customize Salesforce to handle your internal order management process.
Available in Classic and Lightning
Available in Professional, Enterprise, Performance, Unlimited, and Developer Editions
Specify the following order settings from the Order Settings page in setup:
- Enable Orders – To let your sales team track and manage customer requests for products or services, enable orders.
- Enable Negative Quantities for Order Products
- Enable Reduction Orders
- Enable Zero Quantity Orders
Enable Orders
- Open Order Settings in setup
- Check Order Settings
- Save
- Add the orders related list to the desired account, contract, opportunity, and quote page layouts.
If you disable orders, your order-related data is hidden. To access that data, re-enable orders.
Example Order

Reduction Orders
Use reduction orders to track requests to reduce, return, deactivate, or disable a customer’s products or services
A reduction order is an agreement between a company and a customer to process product returns, deprovision services, or reduce services that have been provisioned. For example, if a customer has purchased 30 items through an order and then requests to cancel that order, you can create a reduction order to track the request.
You can create multiple reduction orders for a single order, but you can’t create a single reduction order for multiple orders. For example, to reduce order products that were purchased through three activated orders, you create three reduction orders—one for each original order—even if all those orders are for the same account.
Guidelines for Creating Orders
- When you create an order, the order’s start date and end date must fall between the associated contract’s start date and end date.
- Associate each order with an account and optionally with a contract, depending on your Salesforce admin’s settings.
- You can create an order from the order’s tab and then manually add the associated account and contract. But if you create an order directly on an account or contract via its Orders related list, no extra step is required. The order is associated with that record.
- To create an order with the same details as another order, you can clone it. (If you’re using lightning experience, when you clone an order with products, the products aren’t cloned. Clone the order, and then add products as needed to the new order.)
- If you clone an order with products, you can’t change the new order’s currency or price book.
Considerations for Activation Limitations
- You can activate orders for active contracts but not for inactive contracts.
- You can activate orders only if they include order products.
- You can activate reduction orders for order products only if they result in positive quantities.
- After you activate an order or reduction order, you can modify order products. You can’t add or remove them.
- Before you can deactivate an order that has reduction orders, you must deactivate and delete its reduction orders.
Editing and Deletion Limitations for Order Products
- If an order or reduction order has been activated, you can’t delete its order products. But you can still edit an order product’s fields.
- After an order product has been reduced, you can no longer edit or delete the order product in that order.
Forecasting
Forecasts the amount of sales that will close based on opportunities. Is provided with Sales Cloud licenses in professional and above but has to be enabled.
Very good video. The forecasting notes below come from here.
Collaborative Forecasting
- Default forecasting option.
Customizable Forecasting
- Enabled through support case.
- Product Family Forecasts
- Share Forecasts
- Snapshots and forecast history
- Territory Management – Default hierarchy is role based, but you may request to have Territorial Forecasting enabled.
- Forecast categories reflect aggregate information. Pipeline contains amounts for all open opportunities excluding omitted.
Territorial Forecasting
- Opportunities will have a new field for a lookup to Territories. It must be populated for that Opportunity to appear on Forecast tab.
- For users in one Territory working on an Opportunity from an account in one territory, Territory assignment automatically made. If multiple territories on the record, rules apply:
Forecasting vs Pipeline
If you’re asking about dollar amounts or the likelihood and timing of a sale, you are forecasting. If you’re examining the health of the pipeline and discussing how to improve the chances of winning the deals, you are managing the pipeline. These two conversations are almost always intertwined, but it’s critical to separate them as they are two distinct activities with vastly different inputs:
- Forecasting estimates performance by updating data. It has no impact on sales results.
- Pipeline Management improves performance by discussing pipeline health and how best to win opportunities. It has a monumental impact on sales results.
Communities
Use Cases
Three main use cases:
- Connecting with customers
- Driving sales with partners
- Interacting with employees
Considerations for Enabling Communities
Activate your community to make it accessible to community members. The result of the activation differs somewhat depending on the type of community.
Available in: Enterprise, Performance, Unlimited & Developer Editions
User Permissions Needed
To create, customize, or publish one: “Create and Setup Communities” AND “View Setup and Configuration”
- Salesforce Tabs + Visualforce – Activating the community makes the community URL active and enables login access for community members. If welcome emails are enabled when you activate, a welcome email is sent to all members. If any of those members are new portal users, their welcome email includes their username and password.
- Lightning Communities: Activating the community sends out a welcome email to all community members. Activation is also required to set up SEO for lightning communities. To make the communit URL active and enable login access, publish the community.
Sales Productivity
Salesforce offers a ton of features to increase sales productivity.
-
- High Velocity Sales
Accelerate your inside sales process with a high-productivity workspace. With Sales Cadences, managers can create custom sales processes that guide sales reps through handling different types of prospects. Those cadences appear for sales reps in the Work Queue, a task list that appears inside the Sales Console. And with other productivity-boosting features like Lightning Dialer, Lead Scoring, and out-of-the-box reports, your sales teams have everything they need to handle prospects in a fraction of the time it took before.
- High Velocity Sales
-
- Work with Salesforce from Microsoft® or Google Applications
You know you spend tons of time working prospects from your email and scheduling appointments from your calendar. After Salesforce admins set up these integration products, you can get your Salesforce work done directly from your Microsoft or Google applications like Microsoft Outlook®, Gmail™, or Google Calendar™.
- Work with Salesforce from Microsoft® or Google Applications
-
- Einstein Activity Capture
Let Einstein help keep your email and calendar applications in sync with Salesforce. Then you can get back to more important things, like selling. With Einstein Activity Capture, emails and events that you send and receive are automatically added to the activity timeline of related account, contact, contract, lead, opportunity, and quote records. Plus, contacts and events are synced between the connected accounts and Salesforce.
- Einstein Activity Capture
-
- Relate Emails to Records Using Other Email Applications
It’s easy to track your sales-related communications. Use Email to Salesforce to capture email sent with external email applications such as IBM® Lotus Notes® and Microsoft® Outlook® and with webmail such as Gmail® and Yahoo! Mail®. Then relate those emails to leads, contacts, and opportunities, or to other specific records in Salesforce.
- Relate Emails to Records Using Other Email Applications
-
- Work With Email in Salesforce
Supercharge your productivity with a number of options for sending email right from Salesforce.
- Work With Email in Salesforce
-
- Lightning Dialer
Use Lightning Dialer to access telephony features without ever leaving Salesforce. Make and receive calls, add call notes, and log call information with ease. It just takes a single click from phone number fields in Lightning Experience, such as numbers on contacts, leads, and list views.
- Lightning Dialer
-
- News
Get instant access to relevant, timely news about customers, partners, competitors, and industries you work with. The News component includes articles from the past 30 days, and is available on business accounts, contacts, leads, and the Home page. Articles come from reputable, English-language news sources.
- News
-
- Activities: Tasks, Events, and Calendars
Activities include tasks, events, and calendars. With Salesforce, track tasks and meetings together in lists and reports to easily prioritize your time and keep up with your accounts, campaigns, contacts, leads, and opportunities.
- Activities: Tasks, Events, and Calendars
-
- Notes
Stay organized and on top of all your deals by adding notes to accounts, contacts, leads, opportunities, and more. With Notes, Salesforce’s enhanced note-taking tool, you can use rich text, lists, and images in your notes; relate notes to multiple records; and create notes in Lightning Experience.
- Notes
-
- Social Accounts, Contacts, and Leads
Increase your users’ access to social intelligence and serve customers and prospects better with easy access to social network profiles associated with Salesforce accounts, contacts, and leads. In Salesforce Classic, you can access Twitter and Youtube. In Lightning Experience, you can only access Twitter.
- Social Accounts, Contacts, and Leads
- Salesforce to Salesforce
Salesforce to Salesforce makes it easy for businesses using Salesforce to share records and get updated data on shared records. For example, you can share lead and opportunity data with partners. Salesforce to Salesforce lets your business partners easily integrate your data with their Salesforce records. You can see all of your sharing activity, manage your entire pipeline, share data across multi-tiered partnerships, and integrate your business processes with updates received from your partners using workflow and assignment rules.
Which Email Integration is Right For My Company?
Salesforce offers several products that integrate Salesforce with Microsoft® or Google™ email and calendar applications. Review the options to find the integration solution that best suits how your sales reps work.
| IF YOU’RE LOOKING TO | TRY THIS SOLUTION | WHAT YOU CAN DO | MORE INFO |
|---|---|---|---|
| Work with Salesforce records directly from Microsoft or Google applications. |
|
|
|
| Be even more productive when you are composing emails in Outlook or Gmail. |
(Available for an extra cost in Lightning Experience and Salesforce Classic.) |
|
|
| Work with Salesforce records and email from your IOS or Android device. | Salesforce Inbox
(Available for an extra cost in Lightning Experience and Salesforce Classic.) |
|
|
| Keep events and contacts in sync between Salesforce and your Microsoft or Google Calendar. |
|
|
|
| Write email messages in Salesforce and have them sent through Outlook or Gmail. | Send Through Gmail or Office 365 |
|
Differences Between Files, CRM Content, Knowledge, Documents, & Attachments
Explore the differences between various ways to manage your files and content.
| FILES HOME | SALESFORCE CRM CONTENT | SALESFORCE KNOWLEDGE | DOCUMENTS TAB | ATTACHMENTS | |
|---|---|---|---|---|---|
| Purpose | Upload, store, find, follow, share, and collaborate on Salesforce files in the cloud. | Publish and share official corporate files with coworkers and deliver them to customers. | Create and manage content, known as articles, in a knowledge base. Internal users and customers (on your Customer Portal, partner portal, Service Cloud Portal, or Lightning Platform Sites) can quickly find and view articles they need. | Store Web resources, such as, logos, DOT files, and other Visualforce materials in folders without attaching them to records. | Attach files to records from the Attachments related list on selected detail pages. |
| Common Uses | Upload a file and store it privately until you’re ready to share it. Share the file with coworkers and groups to collaborate and get feedback. Attach files to posts in a Chatter feed on the Home tab, Chatter tab, a profile, a record, or a group. | Create, clone, or modify a sales presentation and save it so only you can see it and work on it. When you’re ready, publish it so other users in your company have access to it. Create a content pack and send it to customers. | Write, edit, publish, and archive articles using the Articles Management tab or find and view published articles using the Articles tab. Customers and partners can access articles if Salesforce Knowledge is enabled in your Customer Portal, partner portal, Service Cloud Portal, or Lightning Platform Sites. Create a public knowledge base so website visitors can view articles. | Add a custom logo to meeting requests by uploading your logo to the Documents tab. | Add a file to a specific record, like an event, marketing campaign, contact, or case by attaching it on the Attachments related list. |
| Supported File Types | All | All | All | All | All |
| Maximum File Sizes | 2 GB |
|
5 MB |
|
|
Salesforce Mobile Apps
- Salesforce Mobile App
- Collaborate Instantly
- Pull up sales figures with a tap
- Organize your day
- See urgent messages
- Find everything faster
- Close deals faster
- Source
- Salesforce Inbox – The Salesforce Inbox mobile app instantly connects your Sales Cloud CRM data to your inbox so you can sell smarter. Now, create new leads, contacts, and opportunities right from your email.
- Quip – Quip’s iOS and Android apps help your team increase momentum – start new sharable docs and spreadsheets, add to existing work, and chat in real-time. No matter where you go, your team is always in sync.
- Field Service Lightning – Put more power in the hands of field service employees. Field Service Lightning is the one mobile app that delivers job schedules, site directions, work-order information, knowledge articles, inventory, and every insight you need to get the job done.
- Wave Analytics – Easily navigate any data, get answers instantly, and collaborate with your team. With native and flexible dashboards for the phone and watch, you can gain insights to move your business forward from anywhere.
- SalesforceA for Admins – Get all your work done while on the go. Whether you’re unlocking locked-out users or resetting users’ passwords, this app is your go-to toolkit.
- Salesforce Authenticator – Secure your apps and data with two-factor authentication. Salesforce Authenticator delivers enterprise-class security with a smooth user experience. With Salesforce Authenticator, it’s even easier for employees to access business-critical apps from anywhere. Employees can approve logins and other actions, including automatic verification from trusted locations, in just one tap.
- Salesforce Marketing Cloud – Run your marketing from the comfort of your mobile device. Track performance from anywhere — manage emails, journeys, and automations. Take action to pause, resume, and cancel email sends, and share your success with your team through your favorite communication channels.
ORIGINAL Territory Management
NOTE: Everything that follows is for the ORIGINAL Version 1 of Territory Management!!!! Enterprise Territory Management Follows This Below!!
Territory management is an account sharing system that grants access to accounts based on the characteristics of the accounts. It enables your Salesforce data to structure your data and users the same way you structure your sales territories.
Available in Classic
Available in Enterprise, Performance, Unlimited, and Developer editions.
NOTE: Original Territory Management is scheduled for retirement for everyone as of Summer ’20. After which it won’t be accessible. Salesforce encourages users migrate to Enterprise Territory Management!
Particularly if your organization has a private sharing model, you may need to grant users access to accounts based on criteria such as postal code, industry, revenue, or a custom field that is relevant to your business. You may also need to generate forecasts for these diverse categories of accounts. Territory management solves these business needs and provides a powerful solution for structuring your users, accounts, and their associated contacts, opportunities, and cases.
Key benefits of territory management include:
- The ability to use account criteria to expand a private sharing model.
- Support for complex and frequently changed sales organization structures.
- Support for transferring users between territories, with the option to retain opportunities.
- Multiple forecasts per user, based on territory membership.
- Territory-based sales reports.
NOTE Territory management only affects accounts and the standard objects that have a master-detail relationship to accounts. For example, opportunities are included in territory management but leads are not.
What Is a Territory?
A territory is a flexible collection of accounts and users where the users have at least read access to the accounts, regardless of who owns the account. By configuring territory settings, users in a territory can be granted read, read/write, or owner-like access (that is, the ability to view, edit, transfer, and delete records) to the accounts in that territory. Both accounts and users can exist in multiple territories. You can manually add accounts to territories, or you can define account assignment rules that assign accounts to territories for you.
You can also control users’ access to the opportunities and cases associated with the accounts in the territory, regardless of who owns the records.
What Is a Territory Hierarchy?
Territories exist in a hierarchy which you can set up with as many nested levels as you wish. For example, you could create a top-level territory named “Worldwide Sales” that has the child territories “North America,” “Europe/Middle East,” “Latin America,” “Africa,” and “Asia/Australia.” “North America” might have the child territories “Canada” and “United States.“ “United States” might have the child territories “Western,” “Central,” “Southern,” and “Eastern.” Finally, “Western” might have the child territories “California,” “Oregon,” “Washington,” “Nevada,” “Arizona,” and “Utah.”
Territory hierarchies do not have to be focused on geography; they can be defined however you like.
How Do Territories Affect Forecasting?
When you enable territory management for your organization, the territory hierarchy also becomes the forecast hierarchy. Your forecast data is derived from the opportunities that are associated with the accounts in your territories. Users have a different forecast for each territory to which they are assigned. For example, if you are assigned to both “California” and “Arizona,” you have a separate forecast for the opportunities you have in each of these territories.”
Assigning Opportunities to Territories
An opportunity can be assigned to a territory when:
- Opportunity is created either manually or during lead conversion OR
- When account assignment rules run that affect existing opportunities
Territory Assignment for Manually Created Opportunities
When an opportunity is created, Salesforce compares the territories associated with the oportunity’s account to the territories that the opportunity owner is a member of:
- If there is a single territory that both the account and opportunity owner belong to, the opportunity is assigned to that territory if “Evaluate this account against territory rules on save” is checked.
- If more than one territory is common to both, no territory is assigned. The opportunity owner must manually assign a territory.
- If no territory is common to both, the opportunity owner cannot assign the opportunity to a territory.
Territory Assignment for Converted Leads
When a lead is converted to an opportunity, that opportunity’s territory assignment depends on several factors, including:
- Whether the account associated with the opportunity is assigned to one or more territories
- Whether the lead owner is a member of the same territory as the account
- The number of users assigned to a territory
- Whether a forecast manager is assigned to the territory
If account only has 1 territory, use the following to determine how opportunity’s territory is assigned:
| LEAD OWNER BELONGS TO SAME TERRITORY AS ACCOUNT | NUMBER OF USERS ASSIGNED TO TERRITORY | A FORECAST MANAGER IS ASSIGNED TO THE TERRITORY | RESULTS |
|---|---|---|---|
| Yes | 1 | N/A | The opportunity is assigned to the same territory as the account and the lead owner becomes the opportunity owner. |
| No | 1 | N/A | The opportunity is assigned to the same territory as the account and the opportunity owner is the sole member of the territory. |
| No | 0 | N/A | The opportunity is assigned to the same territory as the account and the lead owner becomes the opportunity owner. The lead owner is added as an inactive member of the territory. |
| Yes | >1 | Yes | The opportunity is assigned to the same territory as the account and the forecast manager becomes the opportunity owner. |
| Yes | >1 | No | The opportunity is assigned to the same territory as the account and the lead owner becomes the opportunity owner. |
| No | >1 | Yes | The opportunity is assigned to the forecast manager of the territory. |
| No | >1 | No | The opportunity is assigned to the same territory as the account and the lead owner becomes the opportunity owner. The lead owner is added as an inactive member of the territory. |
If the account associated with the opportunity has two or more territories, use the following to determine how the opportunity’s territory is assigned:
| LEAD OWNER’S TERRITORY MEMBERSHIP | RESULTS | ||
|---|---|---|---|
| Lead owner has one territory in common with the account | The opportunity is not assigned to any territories and the lead owner becomes the opportunity owner. The opportunity owner can assign the opportunity to the account’s territory. | ||
| Lead owner has more than one territory in common with the account | The opportunity is not assigned to any territories and the lead owner becomes the opportunity owner. The opportunity owner can assign the opportunity to any territory that he or she has in common with the account. | ||
| Lead owner has no territories in common with the account | The opportunity is not assigned to any territories and the lead owner becomes the opportunity owner. The opportunity owner cannot assign the opportunity to any territories. | ||
Notes About Territory Assignment for Opportunities
- Following don’t change an opportunity’s territory
- Manually assigning the opportunity’s account to a territory
- Changing which account is associated with the opportunity
- Changing the account’s territory as a result of account assignment rules if the opportunity and its accounts are in different territories.
- Transferring the opportunity to a new owner.
- Territory assignment rules do not update an opportunity if the opportunity’s close date is in the past and the opportunity is Closed Won or Closed Lost.
- When an opportunity is not automatically assigned to a territory, we recommend that users be notified if the opportunity is not assigned to a territory manually within one day. You can set up time-based workflow to notify users about unassigned opportunities.
- Restoring an account or opportunity from the Recycle Bin restores the territory assignment, but it does not trigger the evaluation of account assignment rules. If account assignment rules changed while the record was in the Recycle Bin, the restored record may have territories that are inconsistent with the new rules.
- When opportunities are transferred from one user to another, whether individually or as a group, the territory assignment on the opportunities is unaffected. However, if the opportunities are assigned to a user who is not already a member of the opportunity’s territory, that user is added as an inactive member of the territory.
- When users are removed from a territory, you can specify who should receive their open opportunities. Also, when users are transferred from one territory to another, you can specify which opportunities the users should continue to own and select a recipient for any remaining opportunities. If you do not specify a recipient:
- If the parent territory has a forecast manager, the forecast manager takes ownership of the user’s open opportunities. The forecast manager is assigned to the territory and Active in Territory is unchecked.
- If the parent territory does not have a forecast manager, the user remains in the territory and Active in Territory is unchecked.
Enable Original Territory Management
Ask Salesforce to enable it. It’s not enabled by default.
To enable territory managment, your organization must be using Customizable Forecasting. After Salesforce enables it:
- Open Territory Settings in Setup
- Optionally change Org-Wide territory managment settings
- Click either “Enable Territory Management” or “Enable Territory Management From Scratch”.
- Configure territory-related fields, page layouts, and user permissions.
- Begin working with territory hierarchy.
Can be used to define access on accounts, contacts, opportunities, and cases.
Limits
- Classic Only
- Up to 500 territories allowed
- A territory can have an unlimited number of users
- User can be assigned to unlimited number of territories
- Territory can have a maximum of 15 account assignment rules, including active and inactive ones.
- Enterprise Territory Management is available for Collaborative Forecasts.
- Original Territory Management is available for Customizable Forecasting.
Source: Original Territory Management Implementation Guide
Enterprise Territory Management
Use Enterprise Territory Management to manage and maintain your company’s sales territories. Create territory types, build a model, and then add and test your account assignment rules. When you’re satisfied with your model, activate it, then assign users and accounts. Roll it out to your team, and then run reports to assess its impact and make adjustments as needed.
Enterprise Territory Management builds on the original Territory Management feature by introducing territory types, territory models, and territory model states. These components let you create and preview multiple territory structures and strategies before you activate and implement the one that works best. Enterprise Territory Management also offers easier assignments between territories, accounts, and opportunities. Custom reports help you organize your territory model for optimum coverage, assess territory effectiveness, and modify your model. Your team can use Chatter to collaborate as you design and build your territory model. And if you use Collaborative Forecasts, you can forecast by territory.
Available in Classic and Lightning
Available in Enterprise, Performance, Unlimited, and Developer editions
Learn About Enterprise Territory Management
Territories are comprised of the following items: Territory Type, Territory Type Priority, Territory, Territory Model, Territory Hierarchy, and Territory Model State.
Territory Type
Territory types help you organize your territories by key characteristics important to your company. Every territory you create has a territory type. Territory types are used for organizing and creating territories only. They don’t appear on territory model hierarchies.
For example, you can create a territory type called Universal Telco Named Accounts, then from that type, create territories that include named accounts. Or you can create a territory type called US Geographic, and from that type create territories based on states or regions.
When you create a territory type, make sure that the label and description clearly indicate what kinds of territories belong to that type.
Territory Type Priority
Specifying and managing territory type priority information helps you choose the appropriate territory type for territories you create or edit. You create your own priority scheme. For example, 001 can indicate that a territory type is the highest priority or the lowest. Make sure that your scheme can scale as you add more territory types.
When you create a territory, you select a territory type from the Territory Type lookup field. From the lookup, you can view the territory type’s assigned priority.
Territory
Territories organize groups of accounts and the Salesforce users who work with those accounts. Territories are created based on territory types.
The territory record shows assigned users, manually assigned accounts, the forecast manager, and rules that assign accounts automatically. A territory can have both parent and child territories. Depending on how your organization assigns accounts, an account can be assigned to more than one territory.
Territory Model
A territory model represents a complete territory management system for your company. Modeling lets you create and preview multiple territory structures and different account and user assignments before you activate the model that works best.
Each territory model features a graphical hierarchy. The hierarchy shows your model’s territory structure (including parent and child territories) and lets you create, edit, and delete territories and view their detail pages. Your organization can create and modify up to four different territory models at a time, but only one model can be active at any time. Activate the model you want to use to finalize its user and account assignments.
Territory Hierarchy
The territory hierarchy shows a model’s territory structure and serves as its main interaction point. Start from the hierarchy to create, edit, and delete territories; run assignment rules for territories, and navigate to territory detail pages for more information. From the hierarchy, you can also assign territories to opportunities, run assignment rules at the model level, and activate or archive the model. The forecasts hierarchy for territory forecasts is based on your territory hierarchy in the active territory model.
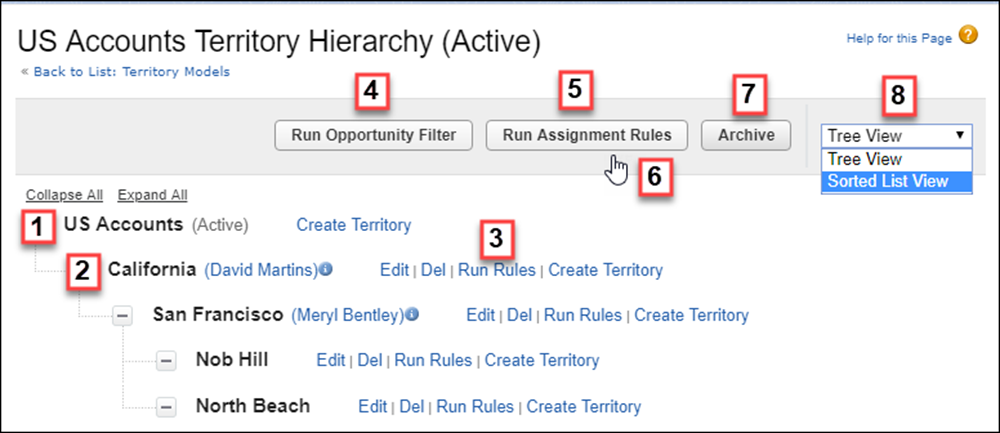
The name and state of the territory model appear at the top node of the hierarchy (1). Parent and child territories are nested beneath the model name. If a territory has a forecast manager assigned, the manager’s name appears here (2). Create or edit child territories, or run their assignment rules (3).
Run the filter that assigns territories to opportunities (4). Run assignment rules for all territories in the model (5). Hover to learn when rules were last run (6). Set the model’s state to Active or Archive (7). Toggle to a sorted list view and back to tree view (8).
Territory Model State
Territory model state indicates whether a territory is in the planning stage, in active use, or archived. You can have only one active territory model at a time, but you can create and maintain multiple models in planning or archived state to use for extra modeling or reference. Some states reflect a territory model’s lifecycle and others indicate errors in processing when states are changed.
| LIFECYCLE STATE | DEFINITION |
|---|---|
| Planning | The default state for every new territory model you create. The Planning state lets you preview a model’s territory hierarchy before deploying it. |
| Active |
The state of a territory model after you activate it and all processing is complete. Only one model in your Salesforce organization can be active at a time. A model in Active state lets users view model details, including hierarchies, territories, and all assigned accounts and users. Users assigned to territories within an active model can access and modify accounts they are assigned to within that model. And territory forecasts are based on your active territory model. |
| Archived |
The state of a territory model after you archive it and all processing is complete. An archived model lets admins view hierarchy and rule assignments as they were configured when the model was active. Only the active model can be archived, and archived models cannot be reactivated. When you archive a territory model or delete a territory on an active model, the Territory field is reset to a blank value on opportunity records with those territories assigned. And when you archive a territory model, Salesforce deletes your territory forecasts, quotas, and adjustments. Before you archive a territory model, consider running the opportunity territory assignment filter and then taking screenshots of the forecasts page. You can also create a snapshot. |
| ERROR STATE | DEFINITION |
|---|---|
| Activation Failed | An error occurred during activation. Check your email for more information from Salesforce. |
| Archiving Failed | An error occurred during activation. Check your email for more information from Salesforce. |
How Do Permissions Affect Feature and Data Access in Enterprise Territory Management?
| USERS WHO: | REQUIRE THESE PERMISSIONS, ROLES, OR OWNERSHIP: |
|---|---|
|
Manage Territories |
|
Manage Territories AND View All on Accounts NOTE Which fields are available for account assignment rules depends on account field-level security settings, if any. For example, a user has the appropriate permissions for creating account assignment rules, but their profile prevents them from viewing the Account object’s Annual Revenue field. They can’t create account assignment rules that include that field. |
|
View Setup and Configuration NOTE View Setup and Configuration is enabled by default for the Standard User profile. |
|
View data for models in Planning and Archived states on reports that include territories, assigned records, or rules |
Manage Territories |
| Manually assign a territory to an opportunity |
Sharing access for the opportunity’s account. Users who have sharing access to the account can assign any active territory to the opportunity. Users who do not can assign only a territory that is also assigned to the opportunity’s account. NOTE For manual territory assignments, Salesforce suggests opportunities assigned to the territory’s account, but users with sharing access can search for and assign any territory in the active territory model. When a territory is assigned to an opportunity, that opportunity is shared with all Salesforce users assigned to that territory’s parent in the territory model hierarchy. |
Enabling Enterprise Territory Management
- Open Territory Settings in Setup
- Click Enable Enterprise Territory Management.
After enablement, you see the following:

Assign Forecast Managers to Territories
To show rolled-up forecasts for a territory, assign a forecast manager to the territory. Without a forecast manager assigned, a territory’s forecasts are based on the individual users assigned to the territory.
Before you assign a forecast manager to a territory, make sure that the following are true.
- Your territory page layout includes the Forecast Manager field.
- The user you want to assign as a forecast manager is forecast-enabled.
- The user you want to assign as a forecast manager is assigned to the territory.
- From Setup, in the Quick Find box, enter Territory Models, and then select Territory Models.
- Click View Hierarchy next to your active territory model.
- Click Edit next to the territory you want to assign a forecast manager.
- In the Forecast Manager field, enter the user you want to assign as the forecast manager.
- Save your changes.
- Repeat these steps for each territory that requires a forecast manager.
Use Rules to Assign Accounts to Territories
Create and run rules that automatically assign new or edited accounts to territories. A rule identifies one or more characteristics you use to define that territory, and tells Enterprise Territory Management to assign accounts with those characteristics to that territory automatically. Accounts are assigned to territories according to your rules automatically on account creation or update only if your territory model is in Active state.
TIP Do not assign a rule to a territory if that rule is a child of another rule already assigned to the territory. To find out what rules apply to a territory, open the territory’s record detail page and look at the Assignment Rules Assigned to this Territory related list. If a rule has Apply to Child Territories selected, do not assign the rule separately to child territories.
- From the territory model hierarchy, open the territory where you want to create a rule.
- On the detail page, in the Assignment Rules Defined in this Territory related list, click New.
-
 NOTE If your org has enabled state and country picklists, territory assignment rules using states as a criteria must use contains matching instead of equals matching.
On the rule edit page, enter a name for the new rule and define selection criteria.
- If you want the rule to also apply to the current territory’s descendents, select the Apply to child territoriescheckbox.
- If you want the rule to run automatically when a user creates or updates an account, select the Active checkbox.
NOTE For account updates, these conditions are required for the territory rules to run.
- If the account is updated via the UI, Evaluate this account against territory rules on save is selected and the rule is assigned to a territory in the active territory model.
- If the account is updated via API, AssignmentRuleHeader is specified.
- Click Save to save the rule and return to the territory detail page.
- (Optional) In the Assignment Rules Defined in This Territory related list, click Run Rules.
You receive an email when the process is complete.

For any child territories for the California territory, you don’t have to specify the state in the criteria if you mark the California territory rule as inheritable to child territories. Instead, you can use more specific criteria, such as ZIP code or industry.
Limits
| EDITION | NUMBER OF MODELS IN PRODUCTION | NUMBER OF MODELS IN SANDBOX |
|---|---|---|
| Developer | 4 | 4 |
| Enterprise | 2 | 2 |
| Performance | 4 | 4 |
| Unlimited | 4 | 4 |
By default, each territory model can have up to 1,000 territories. If you’re using Developer or Enterprise Edition, the maximum allocation is 1,000 territories per model. If you’re using Performance Edition or Unlimited Edition, you can add up to 99,999 territories to a territory model by contacting Salesforce Customer Support. Requests for more than 20,000 territories per model are subject to approval.
We strongly encourage the request to be made based on your organization’s actual needs and not for the maximum limit.
Forecasts
What are Forecasts?
Forecasts are expressions of expected sales revenue. They help sales teams predict and plan their sales cycle from pipeline to closed sales, and to manage sales expectations throughout the company.
In Salesforce, a forecast is based on the gross rollup of a set of opportunities. Forecast amounts are determined by factors such as time period, forecast type, adjustments, and currency. You can think of a forecast as a rollup of currency or quantity against a set of dimensions: owner, time, forecast categories, product family, and territory.
Predicting Sales with Collaborative Forecasts

The forecast amounts on the forecasts page are totals and subtotals of the opportunities in the four forecast categories:
- Pipeline
- Best Case
- Commit
- Closed
Depending on how you set up the feature, these amounts can reflect opportunities from one category or aggregated categories.
You base forecast amounts on opportunities, opportunity splits, or product families. For most forecast types, you can base forecasts on revenue or quantity. For the opportunity revenue and quantity forecast types, you can base forecast amounts on close date, schedule date, or product date. And you can enable up to four forecast types at a time.
Forecast users can view their own amounts or amounts of others below them in the forecasts hierarchy. They can view quotas and quota attainment information. And they can change many aspects of the forecasts page display, such as the currency and the time period.
Forecast Types
Collaborative Forecasts can calculate forecast amounts several ways. You can enable up to four of these forecast types at any time. Here’s how each one works.
| Forecast Type | Hierarchy | Date Type | What the Rollup Is Based On |
|---|---|---|---|
| Opportunities – Revenue | Role | Close date | The opportunity’s Amount and Close Date fields |
| Role | Product date | The opportunity products’ Total Price and Date fields | |
| Role | Schedule date | The product schedule’s Revenue and Date fields | |
| Territory | Close date | For each opportunity that’s assigned to a territory, the opportunity’s Amount and Close Date fields | |
| Opportunities – Quantity | Role | Close date | The opportunity’s Quantity and Close Date fields |
| Role | Product date | The opportunity products’ Quantity and Date fields | |
| Role | Schedule date | The product schedule’s Quantity and Date fields | |
| Product Families – Revenue | Role | Close date | The sum of the Total Price fields for all opportunity line items in a product family. Forecast amounts are separated by product family. |
| Territory | Close date | For each opportunity that’s assigned to a territory, the sum of the Total Price fields for all opportunity line items in a product family. Forecast amounts are separated by product family and then territory. | |
| Product Families – Quantity | Role | Close date | The sum of the Quantity fields for all opportunity line items in a product family. Forecast quantities are separated by product family. |
| Opportunity Splits – Revenue | Role | Close date | The opportunity Amount field and each sales team member’s split percentage. For Opportunity Splits – Revenue forecasts, the split percentages for each opportunity must total 100%. To use opportunity splits forecasts, enable Opportunity Teams, Opportunity Splits, and the Revenue split type. |
| Overlay Splits – Revenue | Role | Close date | The opportunity Amount field and each overlay sales team member’s split percentage. For Overlay Splits – Revenue forecasts, the split percentages don’t have to total 100%. To use overlay splits forecasts, enable Opportunity Teams, Opportunity Splits, and the Overlay split type. |
| Custom Opportunity Currency Field – Revenue | Role | Close date | The amount in the custom opportunity currency field that you specify. To use custom opportunity currency field forecasts, Opportunity Teams and Opportunity Splits must be enabled. Enable a custom split type for the field, even if you don’t intend to split credit for the field amount. |
| Expected Revenue – Revenue | Role | Close date | The amount in the opportunity Expected Revenue field. To forecast on the Expected Revenue field, enable Opportunity Teams and Opportunity Splits. Enable a custom split type for the field, even if you don’t intend to split credit for the field amount. |
What’s a Forecast Rollup?
To best meet your business needs, you can choose between two ways of showing how opportunities roll up into forecast amounts: by individual forecast category or by cumulative forecast.
| Type of Rollup | This Type Combines… |
|---|---|
| Individual forecast category | The opportunities from each forecast category into separate forecast amounts for each category.
With this type, each total and subtotal represents opportunities from only one of the forecast categories. You get a clear idea of where your opportunities are in the sales cycle right now. |
| Cumulative forecast | Opportunities from multiple forecast categories into cumulative forecast amounts.
For your sales pipeline, the forecast columns show cumulative amounts from the opportunities in:
This view makes it easy for sales teams to see the total numbers that they’re likely to bring in without combining the category totals themselves. |
Let’s compare two views of the same situation. We use US dollars in this example. Of course, you can choose the currency that’s relevant to your forecasts.
- Individual Forecast Rollups
-
Closed Commit Best Case Pipeline Forecast amounts $50 $150 $100 $200 Opportunity amounts $50 $50 $50 $50 $50 $50 $50 $50 $50 $50
Cumulative Forecast Rollups
| Closed Only | Commit Forecast | Best Case Forecast | Open Pipeline | |
|---|---|---|---|---|
| Forecast amounts | $50 | $200 | $300 | $450 |
| Opportunity amounts | $50 | $50 | $50 | $50 |
| $50 | $50 | $50 | ||
| $50 | $50 | |||
| $50 |
Enabling Collaborative Forecast Users
A user’s “Allow Forecasting” setting must be checked.
Set Up Your Forecasts Hierarchy
The forecasts hierarchy is a nested, expandable list of forecast users. It determines how forecasts roll up within your company and who can view and adjust them. Your company’s role hierarchy determines your role-based forecasts hierarchy. If you use Enterprise Territory Management, your territory hierarchy determines your territory-based forecasts hierarchy. Then you specify which users are forecast managers in each.
- One in the role Vice President, Sales
- Two in the role Sales Manager, both reporting to the Vice President, Sales
You can see these users enabled in the role-based forecasts hierarchy within their respective roles. But keep in mind, even though the Sales Manager role reports to the Vice President, Sales, in the role hierarchy, the users in the Sales Manager role won’t automatically report to the Vice President, Sales, in the forecasts hierarchy. You must enable a user in the forecasts hierarchy to act as the forecast manager if you want that user to see their team members’ or territories’ forecasts. Only one person at each level in the forecasts hierarchy can be the manager at any one time.
Customizable Forecasts
Use Customizable Forecasting to review your forecast and drill down through your forecast amounts to see the opportunities included. Override forecast amounts directly from the opportunity, or override the forecast from the Forecasts tab without notifying users below you in the forecast role hierarchy.
Available in Classic
Available in Professional, Enterprise, Performance, Unlimited, and Developer Editions
| USER PERMISSIONS NEEDED | |
|---|---|
| To see forecasts of other users: | View All Forecasts |
| To override your forecast: | Override Forecasts |
How do I Make Sure that Customizable Forecasting is Enabled?
To determine whether Customizable Forecasting is enabled, click the Forecasts tab, or, from Setup, enter Forecasts (Customizable) in the Quick Find box.
- If you see the Request Now button on the Forecasts tab, Customizable Forecasting isn’t enabled.
- If you don’t get search results for Forecasts (Customizable) in Setup, Customizable Forecasting isn’t enabled.
Setting Quotas for Customizable Forecasting
Users with the appropriate permission can set their individual quota. Salesforce admins and users with the appropriate permission can edit any quota. And managers can change the quotas of users who report directly to them in the role hierarchy.
REQUIRED EDITIONS AND USER PERMISSIONS
| Available in: Salesforce Classic |
| Available in: Professional, Enterprise, Performance, Unlimited, and Developer Editions |
| USER PERMISSIONS NEEDED | |
|---|---|
| To set your quota: | Edit Personal Quota |
| To set any user’s quota: |
Manage Internal Users AND Modify All Data |
- Do one of the following:
- To set your personal quota, access your personal information in your personal settings.
- To change the quota of a user that reports to you, from Setup, enter Users in the Quick Find box, then selectUsers, and click the full name of the appropriate user.
- Click Edit in the Quotas related list.
- Select the appropriate range start and range length. If available, select a territory and product family.
NOTE If your organization uses custom fiscal years, you cannot set quotas for a period that does not have a defined fiscal year.
- Enter the quota amounts for revenue and/or quantity.
- Select the appropriate currency if you work with more than one currency.
- Click Save to save the quota and return to the user detail page, or click Quick Save to save the values and continue to edit the quota.
Manage Customizable Forecasts
Your forecasts represent your opportunity amounts, dates, and stages. Make sure that your forecasts are an accurate representation of your revenue potential.
Statement: You can add products with schedules in Lightning Experience or the Salesforce app, but must switch back to Salesforce Classic to enable product schedules, or to establish or modify schedules for products. (section opportunities – Considerations for Adding Products to Opportunities)
I think this is also possible now in LEX not only in Classic.