After Test Summary
Passed! Overall, this was pretty challenging because the questions were even more specific and detailed compared to other exams. Am guessing this is due to the narrow scope of the content. If you follow my guide below, you should do pretty good. Some things that caught me off guard were:
- Discussion related questions. Which users can talk to who in the community and how to limit discussion access. There were 3-4 questions around this and I guessed the answers.
- Know the standard lightning component properties. There was a question or two about particular lightning component properties. For example, how to set up an object list for just my records.
- Know the limits around communities too. There were a couple questions around those. For example, how many keyword lists are needed if I have #### keywords?. What is the default number of page views in a month for an enterprise edition?
- Where are particular settings located. Thankfully that wasn’t too bad, for me.
Good Luck!
Overview
This is my study guide I created for myself to prepare for the Salesforce Community Cloud Certification exam. I’ve done a few Customer Community implementations but that was a few years ago before Lightning was available. The exam outline indicates that the exam content is based on the declarative capabilities so one shouldn’t have to know how to customize a Community programmatically but we’ll see.
To prepare, I’ve gone through the Exam Outline, gone through the Resource Guide’s materials, played around with communities in an org, read various blogs, and watched videos. I’ve also typed up a lot of the content below, which comes from the resource material especially the Set Up & Manage Salesforce Communities.
After all this studying, I’m hoping this will be my 2nd certification passed in the Throwing Down the Certification Gauntlet #2 Challenge.
Resources
- Resource Guide
- Exam Outline
- Set Up & Manage Salesforce Communities – This is the latest version I found. The exam guide has an older version.
- Use Templates to Build Communities
- Community Limitations
- Always a Blezard
- Automation Champion
- SFDC Point
- Salesforce Memo
- Salesforce Ben
Exam Outline
- Implementation – 32%
- Determine license types based on Community member persona.
- Evaluate the infrastructure of a Community.
- Describe the capabilities of different deployment types.
- Determine the mobility requirements for a Community.
- Evaluate the integration strategies for a given use case.
- Explain the steps required for a successful Community rollout.
- Given a scenario, determine which limits will influence a Community. (e.g. Community user limits)
- Explain how to set up a custom domain for a Community.
- Sharing and Security – 22%
- Determine security requirements given a scenario that includes collaboration, business process, and / or document requirements.
- Determine the appropriate security model for a given use case (eg. Sharing & Users, Person Accounts, Profiles, Objects)
- Determine the steps to build a public community.
- Given a scenario, determine the steps to provision Community users.
- Community Setup – 17%
- Determine the steps to expose appropriate tabs based on the needs of the Community constituents.
- Determine the steps to configure and set up topics, and map to the associated knowledge articles.
- Determine the steps to configure and set up Knowledge within a Community.
- Identify the Community user login requirements.
- Determine how to set up email for Community users.
- Explain the multilingual capabilities in Communities.
- Community Builder – 18%
- Determine how to customize a Community to match a Company’s branding using Community Builder.
- Determine how to customize navigation to given requirements in a template-based Community.
- Given a scenario, determine optimal ways to deliver targeted web or data content.
- Explain how to customize template components to given requirements.
- Determine the steps to install and set up lightning components.
- Community Management
- Given the user access requirements, determine how to add members to a Community.
- Determine the steps to set up Community dashboards and insights.
- Explain Community moderation features.
- Given a scenario, determine the steps to create recommendations in a Community.
- Given a scenario, determine the steps to set up reputation levels in a Community.
Excluded Topics
- Capabilities and limitation of custom domains
- Advanced best practices for adoption and engagement
- Optimization of SEO
- Scaling issues
- Setting up Person accounts
Communities Overview
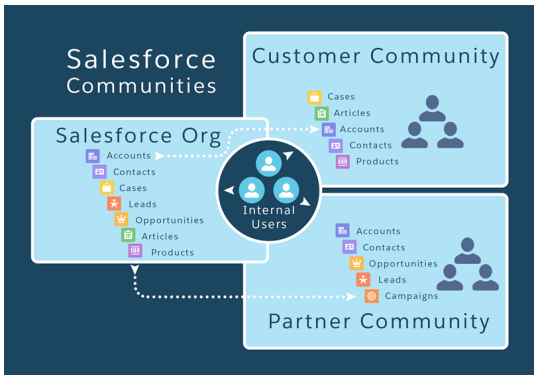
Communities are separate websites hosted on Salesforce that allow employees, customers, and partners interact with your organization for things such as self-service, partner sales & distribution, or perhaps a one-time event. An org can have multiple communities.
Community Templates
Community Templates let you build responsive communities for deliverying rich, branded spaces for customers and partners.
- Customer Account Portal – A private and secure place for customers to access and update their account information. Good place to update their account info, pay invoices, and search your knowledgebase for answers.
- Partner Central – Online space to recruit, educate and drive sales together with your partner users. Exposes CRM objects to drive channel sales and marketing, track opportunities, and share sales and training assets with partners.
- Customer Service – A powerful, responsive self-service template with multiple pre-built theme options that lets users post questions to the community, search for and view articles, collaborate, and contact support agents by creating cases. Supports Knowledge, Chatter Questions, and Cases.
- Build Your Own – Provides the basic pages every community needs: Home, Login pages. Add more as needed.
- Salesforce Tabs + Visualforce – provides standard Salesforce structure and tabs that you can customize using Visualforce. Allows full platform access with a flexible configuration. Supports most standard objects, custom objects and the Salesforce app. Is basically Salesforce Classic in a community. Doesn’t support community builder.
- Kokua – visually rich self-service template that presents users with knowledge articles organized by data categories. users can also submit cases to get help from agents.
- Koa – A text based self-service template that’s optimized for mobile devices. It lets users search for and view articles by text representation of data categories.
- Aloha – A configurable App Launcher template that lets users quickly find applications and access them using Single Sign-On authentication, including Social Sign-On.
Community Setup
Enabling Communities
Enabling communities is the first step. Once turned on, it can’t be disabled.
- From Setup, check “Enable Communities” under Communities Settings.
- Select a domain.
- The domain is the same for all communities but each community has a unique URL in the path.
- Save
Now you use Community Workspaces to build, set up, and monitor your communities.
Community Workspace
Your one stop shop for building, setting up, and monitoring your community. The Workspaces contain the following:
- Builder – Community Builder lets you brand and design your community pages. Create and customize pages, add or change Lightning Components, customize the community’s navigation menu, and mage page-level settings.
- Moderation – view your community’s home page dashboard and reports for flagged posts, comments, messages, and files. From the Rules tab, admins can set up moderation rules and content criteria.
- Content Targeting – Manage your community’s Topics and Recommendations. Create a navigation menu and showcase popular topics from the Topics Tab. Drive community engagement from the Recommendations tab.
- Dashboards – View Dashboards and reports for your community. The admin sets up dashboards that display in the Reporting tabs. Monitor activity and take immediate action in your community from the Engagement tab using Insights.
- CMS Connect – Connect your CMS to your community. Dynamically render headers, footers, banners, CSS, Javascript and other content from Adobe Experience Manager on your community pages.
- Administration – One can update basic setup for the community including:
- Members – Add or remove members by profiles
- Tabs – Select the tabs you want members to see in communities built using the Salesforce Tabs & Visualforce template.
- Branding – Select an out-of-box branding theme for communities using the Salesforce Tabs & Visualforce template.
- Login & Registration – Select the default community login and self-registration pages, or manage custom pages.
- Emails – Customize sender information, branding, and templates in your community emails.
- Pages – Configure page assignments for your community and access the LIghtning Platform & Site.com settings for your community pages.
- Preferences – Enable other features such as content flagging, nickname display, direct messages, public access to Chatter, and file limits.
- Settings – Edit your community name, description, and URL. You can also manage the status of your community and update your community template.
- Reputation – Set up reputation levels and points to reward members for activity in the community feed.
Enable Super User Access for your Communities
Enabling super user access grants super user access to partner users in communities. Super user access allows partner users to view the data of other users with the same role in the partner role hierarchy. You can grant super user access to anyone with a Partner Community or a Customer Community Plus license.
Super users can access data owned by other partner uses who have the same role or a role below them. It applies to cases, leads, custom objects, and opportunities only. External users have access to these objects only if you expose them using profiles or sharing and add the tabs to the community.
The “Portal Super User” permission lets delegated external user administrators do the following for their OWN account:
- View, edit, and transfer all cases
- Create cases for contacts
- View and edit all contacts, whether communities-related or not
- View account details when they’re the contact on a case.
- Report on all contacts, whether portal enabled or not, if the Reports tab is added to your community and the user has the “Run Reports” permission.
High-Volume Community Users
They are limited-access users intended for orgs that have thousands to millions of community users. They don’t have roles. High-volume Community users include the Customer Community, High Volume Customer Portal, and Authenticated Website license types.
Characteristics
- Are Contacts enabled to access a community
- Are assigned to the Customer Community, High Volume Customer Portal, or Authenticated Website license.
- Only share the records they own with Salesforce users in sharing groups.
Access to Records
- They can access their own account and contact records, based on implicit sharing.
- They have “Read” access on the account they belong to.
- They can access a record’s parent, and the organization-wide sharing setting for that record is “Controlled By Parent”.
- The organization wide sharing setting for the object is Public Read Only or Public Read/Write
Sharing Sets can grant additional high volume users additional access to records.
Limitations
- Can’t manually share records they own or have access to.
- Can’t transfer cases from non-high-volume users to high-volume community users.
- High-volume community users can’t own accounts.
- You can’t add case teams to cases owned by high-volume community users.
- Can’t include High Volume users in:
- Personal Groups or Public Groups.
- Sharing Rules
- Account Teams, opportunity teams, or case teams.
- Salesforce CRM Content libraries.
- These limitations also apply to records owned by high-volume community users.
- Can’t assign High-Volume users to territories.
Sharing Sets
A sharing set grants high-volume users access to any record associated with an account or contact that matches the user’s account or contact. You can also grant access to records via access mapping in a sharing set, which supports indirect lookups from the user and target record to the account or contact. For example, grant users access to all cases related to an account that’s identified on the users’ contact records.
Sharing sets apply across all communities a high-volume community user is a member of.
Available Objects
- Account
- Asset
- Contact
- Case
- Custom Objects
- Order
- Person
- Service Contract
- User
- Work Order
NOTE: List excludes Objects with an organization-wide sharing setting of Public Read/Write AND custom objects without an account or contact lookup field.
Share Groups
Share Groups allow you to share records owned by high-volume users with internal and external users in your communities. They apply across communities. One can add both internal users as well as external users from the same parent account as the high-volume user.
Create Community Users
To allow an external user to access your community, add the user to an account as a contact record. Then enable the contact record as a customer user or partner user as needed. From a contact record, Manage External User –> Enable Partner User or Enable Customer User button.
Community User Licenses
There are three Community LIcenses for external users:
- Customer Community (CC) – Business-to-consumer communities with large numbers of external users.
- Customer Community Plus (CC+) – Business-to-Business communities for support and non-sales scenarios, such as eCommerce
- Partner Community (PC) – B2B communities that need access to sales data such as partner relationship management.
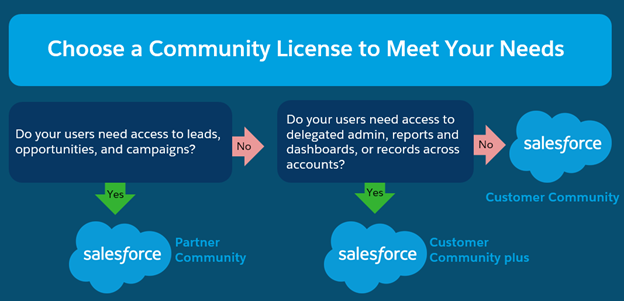
Can create a Knowledge Base public community for unauthenticated (guest) users without purchasing communities licenses. For example, they can read content, review knowledge articles, and perform tasks which do not require login such as creating cases.
Communities licenses are associated with users and not a specific community. A user can move between communities in the same org.
Upgrade Community User Licenses
A Community or Portal user’s license can be upgraded to Customer Community Plus or Partner Community licenses. Upgrading requires the user have a role and this irreversible. If no role specified, lowest role in hierarchy is used.
Users upgraded to Customer Community Plus are automatically associated with the “All Customer Portal Users” public group. Users upgraded to Partner Community are associated with the “All Partner Users” public group.
Upgradable Licenses
- Customer Community
- External Identity
- High Volume Customer Portal
- Overage High Volume Customer Portal
- Authenticated Website User Overage
- Authenticated Website User
Guest User For Unauthenticated Users
Each community has a “Guest User” that Salesforce uses for unauthenticated users to allow public access.
Communities License Limitations
- Customer Community & CC+ license username must be unique per org.
- Partner Community and Employee Community License usernames must be unique across all orgs that users belongs to.
- Partner Community license must be associated with a business account that is enabled as a partner account. Partner users can’t be associated to person accounts.
- Customer community licenses support sharing sets, but not sharing rules. Sharing Sets don’t support objects that are associated with multiple other objects of the same type, for example, the Contacts to Multiple Accounts feature. To use them, use CC+ or Partner Community license.
- Customer users can’t update case statuses in communities built on the Salesforce Tabs + Visualforce template on desktop browsers.
- Users with the Partner Community license can’t access the Quotes tab in communities using the Salesforce Tabs & Visualforce template. They can view, modify, and update quotes from other UI locations such as from opportunities.
Community Limits
User Source, General Limits Source
- Up to 100 communities per org. Active, inactive, and previous communities count.
- 5,000 roles per org is default. Contact support to increase it.
- Number of Guest Page Views
- 500,000 for Enterprise Edition
- 1,000,000 for Unlimited Edition
- Overages are calculated on a yearly basis. If overages are encountered, community still available but you have to purchase a higher limit.
- Logged in page views don’t count!
- 1GB of bandwidth per rolling 24hour period per community for Enterprise and Unlimited editions. 40GB for Performance
Community 360
When enabled in your org, you’re allowing data to be gathered from community members and stored in Salesforce. Things to keep in mind:
- 360 gathers and stores page views of cases and article detail pages of logged-in community members
- Data from all logged-in members is collected. Can’t specify a subset of users to collect data from.
- It gathers and stores page views of cases and article detail pages of internal Salesforce users, but you can’t view the information in the Service Console.
- Only Salesforce users with the View Community 360 profile permission see the data.
- 360 isn’t supported in Salesforce Tabs + Visualforce template.
- 360 doesn’t track Salesforce for Android and Salesforce for iOS community activity.
Brand Your Community’s Login Page
One can brand the default login page by:
- Logo
- Change background colors
- Custom Footer
- Change content on right side.
Other Customization Options
- Login
- Change Password
- Forgot Password
- Dynamic Branding
- Custom Self Registration
Self-Registration For Your Community
Enable self-registration to allow unlicensed guest users to join your community. When your users self-register, you can choose to save them as contacts under a business account or create a person account for each self-registering user.
When a user self-registers:
- A user record is created with the information provided on the self-registration page
- User is assigned the profile that you specified when self-registration was set up.
- User is is associated with a business account or a person account, depending on how you set it up. If no account specified, person account created.
Note: Only Customer Community, CC+, and External Identity licenses support person accounts.
Other Salesforce Features in Communities
- Knowledge – Customers can view knowledge articles
- Cases
- Case Feeds – Allows customers to have discussions over customer cases
- Analytics – Let partners view dashboards.
- Chatter Questions
- Direct Messages
- Question-to-case – lets moderators create cases from unresolved questions in Chatter.
- Field Service Data
- Rich Publisher Apps
- Ideas
Community Builder
Lets you quickly create and style your custom community.
Capabilities
- Drag-n-drop Components
- Theme the community
- Edit community settings and accept updates.
- Manage Pages – Add, edit, delete pages in community. Page Variation
- See how community appears on different devices
- Publish changes.
Theme Your Community
The theme panel lets one apply color, fonts, and style as needed. Match your colors precisely by uploading your own logo to automatically generate a custom color scheme.
Each template includes predefined styles to control the appearance of pages. Can adjust the styles as needed to suit your needs.
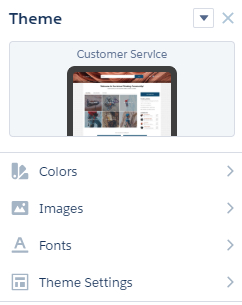
Theme Options
- Choose colors for text, actions, links, navigation, and borders.
- Update company logo to generate a custom color scheme based on its main colors.
- Specify font family, style, weight, and case, and add a custom font.
- Change header and page background color.
- Use a branding set to quickly target different audiences and needs.
- Choose a custom Search component.
- Choose a custom User Profile component.
- Use custom CSS to apply your own styles.
General Settings
- Community Template – Displays the name and template version.
- Public Access – When checked, guest users can view asset files on public pages by default. Users whose profile settings are more restrictive may not be able to view this page, even if it’s public.
- Community Title – Lets you set the title for your community. Title briefly appears in the browser’s title bar before your community’s Home page loads.
- Published Status – Indicates whether your community is published. If published, click the link to open the live community in a separate browser.
- Preferred Domain – Lets you choose which domain to use for indexing your community’s pages to improve search results. This appears only after you set up domains and custom URLs.
- Guest User Profile – Displays the associated guest user profile. Clicking the links opens the profile.
- Set Featured and Navigational Topics (Customer Service template only) – Define featured topics and topics to be used for navigation in Community Workspaces or Community Management
Theme Settings
You can control the layout and appearance of each page in your community
Languages Settings
Set the multilingual properties for your community. When set, they’re used by the Language Picker component, which lets guest users select their preferred language on a page in your community. Can also specify the Default Community Language.
Advanced Settings
Track page views, add markup to the page head, and show all components in the Components panel. Track page views by adding a Google Analytics value. Head Markup adds markup to the <head> element on every page. The “Show All Components” checkbox will show all components in the components panel on every page and will require manually configuring because they require special parameters.
CMS Connect Settings
Use a header and footer from a connected CMS source in your community.
Updates Settings
Update your community’s template to the latest version.
Developer Settings
Allows one to easily export customized Bolt solutions and pages.
Page Menu & Settings
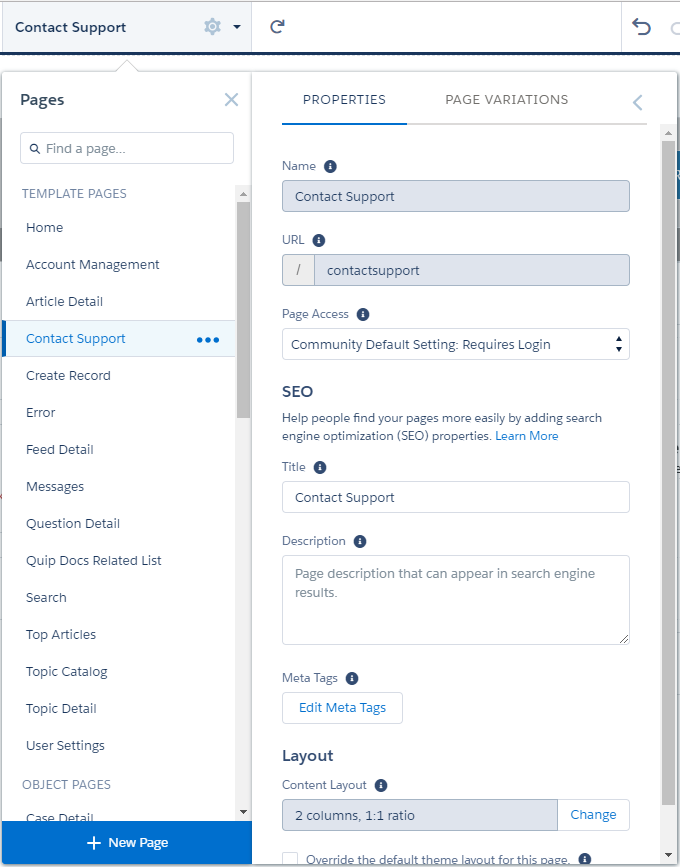
The page menu at the top of the community builder lets one see all the pages in the community and the settings for each page. The pages are grouped by type in the menu.
Page Types
- My Pages – The standard pages that you create. (The object pages that you create appear under objects.)
- Template Pages – Default pages that come with the community template
- Objects – The pages of the objects in your community, which include the objects’s record detail, list, and related list pages.
- Generic Record Pages – These generic pages are used to display record information for a Salesforce object when custom object pages don’t exist.
- Login Pages – Default login pages that come with the community template.
Page Settings
The settings for an individual page.
- Name – The name of the page as it appears in Community Builder. Editable only in the standard pages that you create.
- URL – The URL of the page. Editable only in custom standard pages.
- Page Access – The level of access for the page. It has two settings:
- Requires Login
- Public – Doesn’t require login. Users whose profile is more restrictive may still not see the page even though it’s public.
- SEO – Search Engine Optimization. Enter in the Title, Description, and other meta tags for the page. Can use {} expressions with the object, title, and field names in the Title, Description, and meta tags.
- Layout – Specifies the content regions of your page, such as a two-column layout.
- Override the default theme layout for this page – When checked, you can choose to apply a different theme layout for the page.
Edit Community Pages & Components in Community Builder
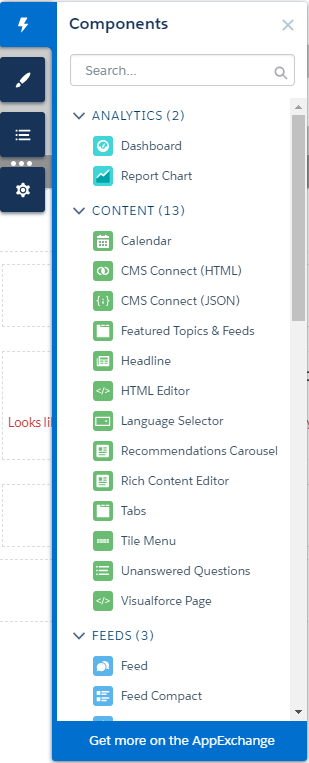
The components panel shows only the components that are eligible with the selected page. For example, you can’t add the User Profile component to the Home page. Drag and drop components onto the page from here as needed. Then you can configure the components properties like you can in the app builder in Lightning Experience (LEX).
Create Custom Pages With Community Builder
One can add custom pages using the Pages Menu.
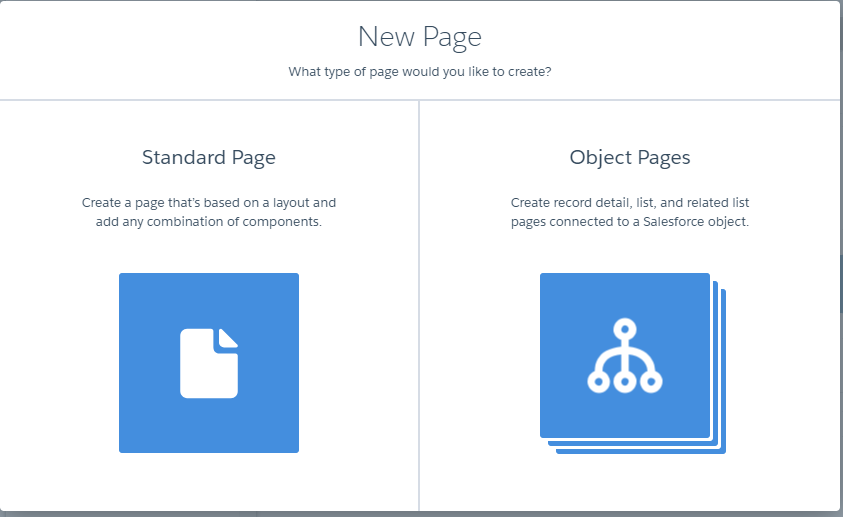
Note: Object Pages are Customer Service (Napili) template only.
Public Settings
One can make the entire community public with the “Public can access the community” general setting. Then, one can also specify if pages are public or not per page. The last level is at the component level within each page.
Note: Some pages are always public and some always private. Always public pages include login related pages like Login, Register, Forgot Password, Login Error and Check Password. The “Messages” page for direct messages is always private.
If a community or page is public, the “Let guest users view asset files on public pages” preference is enabled in Administration > Preferences. This lets guest users view asset files shared with the community on publicly accessible pages.
Page Variations and Audience Targeting for Pages & Groups
Criteria-based page visibility lets you create different versions of your page and make those variations available to specific audiences and groups.
Note: This functionality is available in Winter 16 and later versions of the Customer Service (Napili) template.
Page Variations
These are alternative versions of a page. You can use them to try out different page layouts and styles, or create variations that are aimed at distinct audiences. Every page in your community, including custom pages, must have one default page variation. You can add as many variations as needed. The variations are determined by “Audiences”.
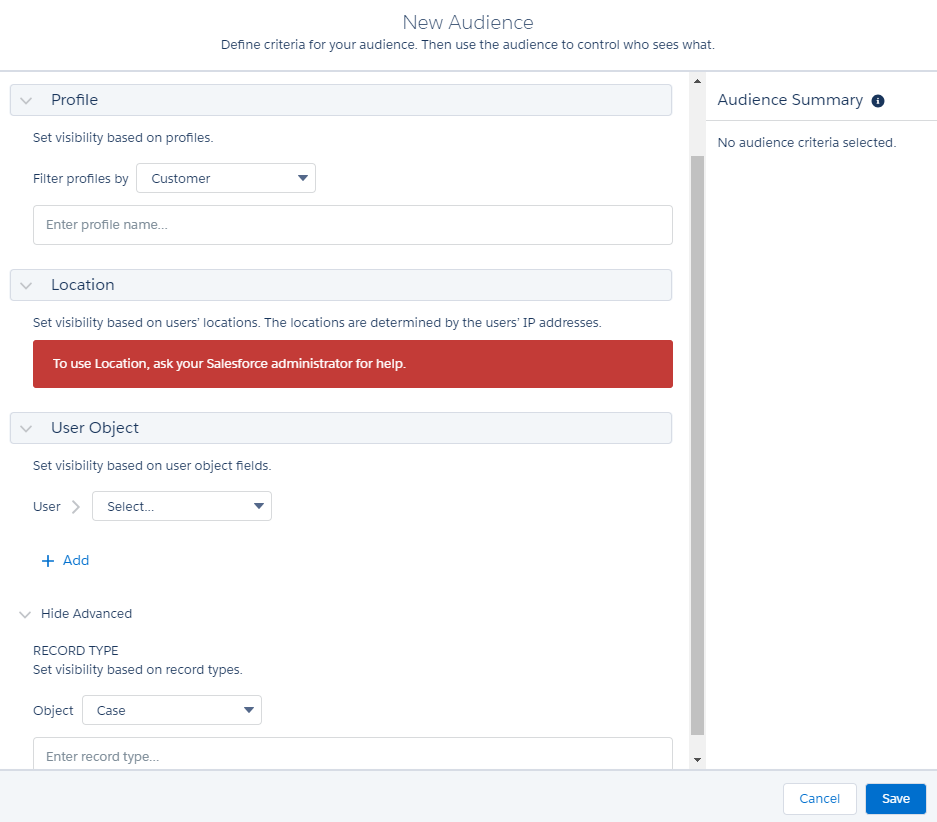
Eligible “Audience” Criteria Options
- Profile
- Location
- Record Type
- User Object fields
Location Considerations
- Have to Contact Salesforce to enable it in Developer Edition orgs.
- Doesn’t work in countries that don’t allow the use of the Google API.
Audience Considerations
- If multiple page variations, the page with the most criteria is displayed to the targeted users. If you have pages with similar criteria, the rank of the criteria determines the displayed page. Priority Order:
- Profiile
- Record Type
- Location going from the most specific (like state) to the broadest (like country)
- Performance – Limit Audiences to significant differences. For minimal differences, use actions to dynamically vary the component content instead.
- Location is based on the user’s IP location, which may be in a neighboring area.
Audiences Usable in Components
- You can’t assign Record Type criteria to a component.
- You can’t assign audiences to the components in the template header and footer sections.
Groups in Communities
One can expose “Chatter Groups” in a community.
External Data Sources in Your Community
Access your external data and content that are stored outside your org from your Customer Service (Napili) template community. One can access data via Salesforce Connect or external files through Files Connect.
Community Migration, Packaging, and Distribution
You can migrate your community between related orgs, such as your sandbox and production org, using change sets. With managed packages, you can distribute customized Lightning Bolt solutions or pages to other Salesforce users and orgs, including people outside your company.
Migrate Your Community with Change Sets
You can use change sets to move Lightning communities and Salesforce Tabs + Visualforce communities.
In target org, create a community (if one doesn’t exist) with the same name and template version as the community in your source org. For communities, you can only make updates with change sets, which means you can’t create a community from a change set.
Considerations
- Changesets override the target community. They can delete pages but not delete components.
- Until you publish your community in the target org, settings for the change password, forgot password, home, self-registration, and login pages appear to return to their default values.
- Unsupported Settings and Features
- Navigational and featured topics
- Audience Targeting
- Branding Sets
- Languages
- Dashboards and engagement
- CMS Connect
- Recommendation Images
- Branding panel images in Community Builder
- Following Administration Settings in Community Workspaces or Community Management
- Account field in the registration section of the Login and Registration area.
- The Settings Area
- The Rich Publisher Apps area.
Lightning Bolt Solutions: Build Once, Then Distribute and Reuse
You can create and export industry-specific solutions to jump-start new communities or package and distribute them for others to use. A lightning bolt solution comprises a customized Lightning template that’s made up of a theme layout and CSS, along with pages, content layouts, and Lightning components. Any Lightning template can be used as a base.
Considerations
- Koa and Kokua templates can’t be exported because they’re being retired.
- Exported template name must be unique.
- Only the following Administration settings are included:
- Change password page
- Forgot password page
- Home Page
- Login Page
- Allow internal users to log in directly to the community option
- Most settings aren’t included.
- If you upgrade a managed package template, existing communities that are based on the upgraded template aren’t upgraded.
- One can export a single page.
CMS Connect
Content Management System (CMS) Connect lets you embed assets from a third-party CMS in your Salesforce community. You can connect CMS components, HTML, JSON, CSS, and Javascript to customize your community and keep its branding consistent. We support personalized content from Adobe Experience Manager (AEM) as well.
Maintenance is a breeze because content from the CMS is rendered dynamically. CMS is the smart way to display headers, footers, banners, blogs, articles, and other reused content in your community.
Supported CMS Providers
- Adobe Experience Manager
- Drupal
- SDL
- Sitecore
- WordPress
Note: CMS Connect can still work with another provider if you set it up properly. CMS Connect works with the HTML/CSS/HTTP standards and isn’t provider specific.
Requirements
- Web Server must support HTML fragments. Fragments can include headers, footers, components, CSS, or Javascript.
- URLs in CSS and Javascript must be absolute
- Community Host must be a trusted host in the Cross-Origin Resource Sharing (CORS) header
- CMS Connect filters out the same HTML Tags that Locker Service and Lightning Components do.
- Web Server must be accessible via unauthenticated HTTPS (HTTP over SSL)
- All Javascript and CSS must be from the same source as HTML
- Community Workspaces must be enabled
- CMS Connect org perm must be left on
Community Managers, Moderators, and Admins Working Together
A community manager and moderator work hand-in-hand. The community manager is typically responsible for monitoring adoption and engagement. The moderator is typically responsible for ensuring the community is healthy and members feel encouraged to be active and helpful to each other.
Management
Here are management areas
- Home – View your community’s home page dashboard.
- Engagement – Monitor recent activity and take immediate action directly from Community Management or from the Moderation workspace in Community Workspaces. If Engagement doesn’t appear, admin hasn’t mapped Insights for this community.
- Dashboards – View dashboards and monitor info about groups, members, feed activity, moderations, topics, and license usage for this community. If Dashboards doesn’t appear, the admin hasn’t mapped dashboards for this community.
- Moderation – View reports for flagged posts, comments, messages, and files. You can also see a report of all posts that are pending review and set up moderation rules for this community.
- Topics – Create a navigation menu and showcase popular topics in your community. Typically, an admin sets up Navigational topics and featured topics. If Topics doesn’t appear, your community isn’t using Topics.
- Recommendations – Help drive engagement in a community. They can be set up to encourage users to watch videos, take trainings, and more. If it doesn’t appear, an admin hasn’t set it up.
- Reputation – Set up reputation levels and points to reward members for activity in the community feed. Your admin sets up Reputation.
Community Manager
A community manager is someone that takes an active role in making sure the community thrives. They must be an employee of your organization; external community members can’t be managers.
To assign someone as a community manager, give them the “Manage Communities” permission. With this permission, they can access the Community Management or Community Workspaces.
Community Moderator
A community moderator helps ensure the success of the community by monitoring user activity and flagged items. Moderators can be internal users or external users but only internal users can moderate within Community Management and Community Workspaces. External users who are moderators can moderate within the context of the community, such as directly in the community feed.
A community moderator is different from a chatter moderator. Assign moderators by giving a user one or more of the following permissions:
- Moderate Communities Feeds
- Moderate Community Files
- Moderate Communities Chatter Messages
- Can Approve Feed Post and Comment
- Moderate Community Users
- Manage Communities
- Access Community Management
Moderation Capabilities
- Designate specific users as moderators
- Allow members to flag posts, comments, files, and message that are inappropriate or spam
- Allow moderators to review and act on flagged items, such as deleting posts, comment, or file
- Allow group owners and managers to moderate within their groups
- Create rules and criteria to automatically block, flag, replace keywords in member-generated content, such as posts or comments
- Create rules to review and approve content from specific members
- Track flagging and moderation activity within your community.
- For advanced moderation logic for your community, you can create triggers that flag content. Custom triggers run behind the scenes automatically.
Moderation Criteria
Create criteria that define keywords or groups of members. Criteria are used in rules to moderate member-generated content, such as posts and comments.
Content Criteria
Content criteria define offensive language or inappropriate content that you don’t want in your community.
Some things to keep in mind:
- Your org can have up to 30 keyword list criteria. This limit is per org, not community.
- A keyword list can have up to 2,000 keywords.
- Capitalization and trailing punctuation are ignored.
- Keywords can only be up to 100 characters and can include letters, numbers, spaces, and special characters
- Wildcard keywords aren’t supported
- Separate keywords with commas or linebreaks
Member Criteria
Use member criteria to use in community moderation rules. Target specific groups of members based on their profile, user type, user creation date, or whether they’ve posted or previously commented.
Some things to keep in mind:
- Your org can have up to 100 member criteria.
- Each member criteria can include up to 100 user conditions.
- Filters can be any combination of profile, user type, user creation date, and other available filters.
Moderation Rules
Used to moderate member generated content. Each rule specifies the member-generated content the rule applies to, the criteria to enforce the rule on, and the moderation action to take.
Moderation Rule Considerations
- Org can have up to 30 rules. This includes both content rules and rate rules.
- Each content rule can have up to 3 keyword criteria and 10 member criteria.
- Rules that block content run first, followed by rules to review and approve, then rules that replace content, and last the rules that flag content. If two or more rules perform the same action, the oldest rule runs first, based on the date the rule was created. Rules to replace content don’t run when the content also applies to a review rule.
- Moderation rules only apply to feed posts, comments, and polls. Moderation rules do not apply to topics that are created.
Rate Limit Rules
Used to monitor and limit how frequently member-generated content is created in your community. These protect against spammers and bots. Each rate rule controls two actions: notification and freeze. You can setup a rule for both actions or just one. You can apply the rule to posts, comments, and private messages. In custom service template, this applies to questions and answers.
Grant Super User Access to a Partner User
Super users can access all data owned by or shared with other partner users with the same role or below them in the role hierarchy.
A few considerations before granting super user access to users:
- Enable “Partner Super User Access” in you Communites Settings
- Partner super user access only applies to cases, leads, custom objects, and opportunities.
Delegated External User Administration
If your partner organizations have a large number of users, you can delegate user administration to external users.
External delegated administrators can:
- Create and edit external user records
- Generate new passwords for external users
- Deactivate existing external users
Provisioning External Users: The Basics
Manual Provisioning
- Create a contact record and associate it to an account.
- Create a user record from the contact and assign a user profile that has access to your communities.
The account type the contact is associated with determines the users you can provision:
|
Contact associated with… |
Impact on user provisioning… |
|
Person account |
Can only create customer users |
|
Non-partner account * |
Can only create customer users |
|
Partner account * |
Can create customer and partner users |
Self-Registration
For B2C communities, usually individuals self-register and create an account.
User Flow
- Visitor clicks or is redirected to the Self-Registration page.
- Visitor fills out the form and submits info.
- Salesforce creates Contact and User records.
- If user has been previously added to the community, user gets instant access to the community.
- Optionally, an email is received (option needs to be selected in setup).
Chatter Answers
Chatter answers combines questions and answers with Salesforce knowledge to allow your customers to be their own tier-one support.
NOTE: Chatter Answers will no longer be supported in all Salesforce orgs as of Spring 18 release. Instead you can use Chatter Questions, a Q&A feature that’s seamlessly integrated into Chatter. Existing orgs will continue to have Chatter Answers if enabled before Summer 16 release.
Setup Steps
1. Enable Chatter Answers
2. Create a Chatter Answers Zone
3. Assign Data Categories to Chatter Answers
4. Set Up Chatter Answers Users
5. Set the Q&A Tab Visibility
6. Configure Email Notifications for Chatter Answers Users
Topics Setup
Structure your community’s content and help your users find what they need with navigational topics. If your organization uses data categories, community managers can link current Salesforce Knowledge articles associated with those categories to each navigational topic.
Navigational Topics Setup
- Open “Topics for Objects” in Setup and “Enable” topics for all the article types you want to include.
- Open Community Workspaces or Community Management
- Open “Content Targeting” in Workspaces
- Click Navigational Topics. Add topics, add banner images to each one, set their display order and assign articles to them as needed.
- Save
Featured Topics Setup
Feature topics highlight current, popular community conversations. Change them regularly to keep community members updated and engaged.
- In Workspace, open “Content Targeting”
- Click Featured Topics.
- Search for existing topics and add them as desired.
- Save
Knowledge Setup
- Enable “Salesforce Knowledge” in Setup under “Knowledge Settings”.
- Set the desired Knowledge settings.
- Assign knowledge user license by checking the “Knowledge User” checkbox on each user.
- In your community, update each community profile to have read permission on the desired article types such as “Knowledge”.
- Add the Knowledge Tab to the community.
- Tell article creator users that they must select “Customer” or “Partner” as a channel option when creating an article so articles appear in the desired community.
Community Builder Navigation Setup
Community Dashboard Setup Steps
- Open Community Workspaces
- Click Dashboards
- Select the dashboard to show on each page.
- Save
Dashboards are visible to community managers when they expand the Dashboards section or visit the Home page.
Create Community Dashboard
- Create custom report type based on “Networks” object. Network is the standard object for a Community.
- Select one or more child objects
- Chatter Messages
- Feed Revisions
- Groups
- Network Audits
- Network Activity Daily Metrics
- Network Feed Revisions
- Network Members
- Network Membership Daily Metrics
- Network Moderations
- Network Public Usage Daily Metrics
- Network Unique Contributor Daily Metrics
- Recommendation Metric
- Topic Assignments
- Topics
- Unpublished Feed Entities
- Create a report from the report type.
- Do not filter by Network Id so the report dynamically displays data for the community it’s viewed from.
- Create a dashboard with components.
- Share dashboard folder with community managers
- Map the dashboard to the desired page in Workspaces –> Dashboards.
- Select one or more child objects
Community Insights Setup Steps
- Install the Salesforce Communities Managment package.
- Open Community Workspaces
- Click Dashboards
- Open Engagement
- Map the Insight Folders to each Insights page.
Recommendations Creation Steps
Create recommendations to drive engagement for your community, encouraging users to watch videos, take trainings, and more. Target specific audiences and use channels to specify locations for the recommendations.
- Open Workspaces
- Open Recommendations through Content Targeting –> Recommendations
- Select Default Channel or one of the custom channels.
- Default Channel – Recommendations in the default channel appear in predefined locations, such as the Home and Question Detail pages in Customer Service and Partner Central communities.
- Custom Channel – You choose the pages where you want these recommendations to appear. In Community Builder, add the Recommendations Carousel component to the page where you want the recommendation to appear. Use the property editor to specify the custom channel with the recommendation.Using a custom channel, you could surface a recommendation to review specific knowledge articles on a product description page to guide customers to more information.
- Complete the desired fields
- Save
